Blog My Minds


  • 首页

  • 分类

  • 归档

requests的高级功能-重试机制

发表于 2016-07-30   |   分类于 python , requests   |  

requests中的重试


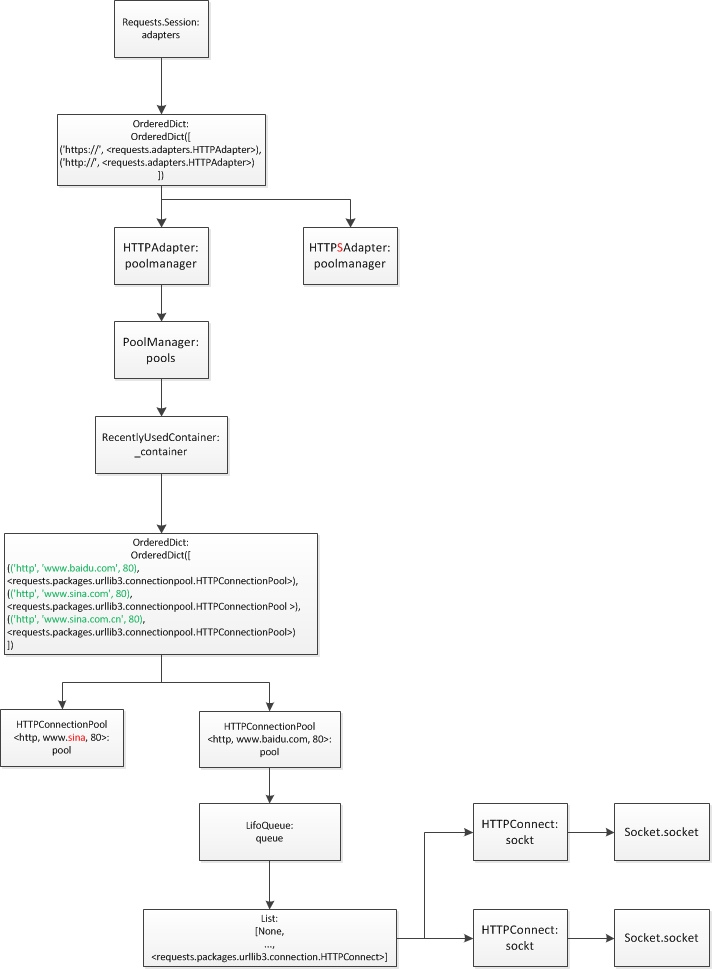
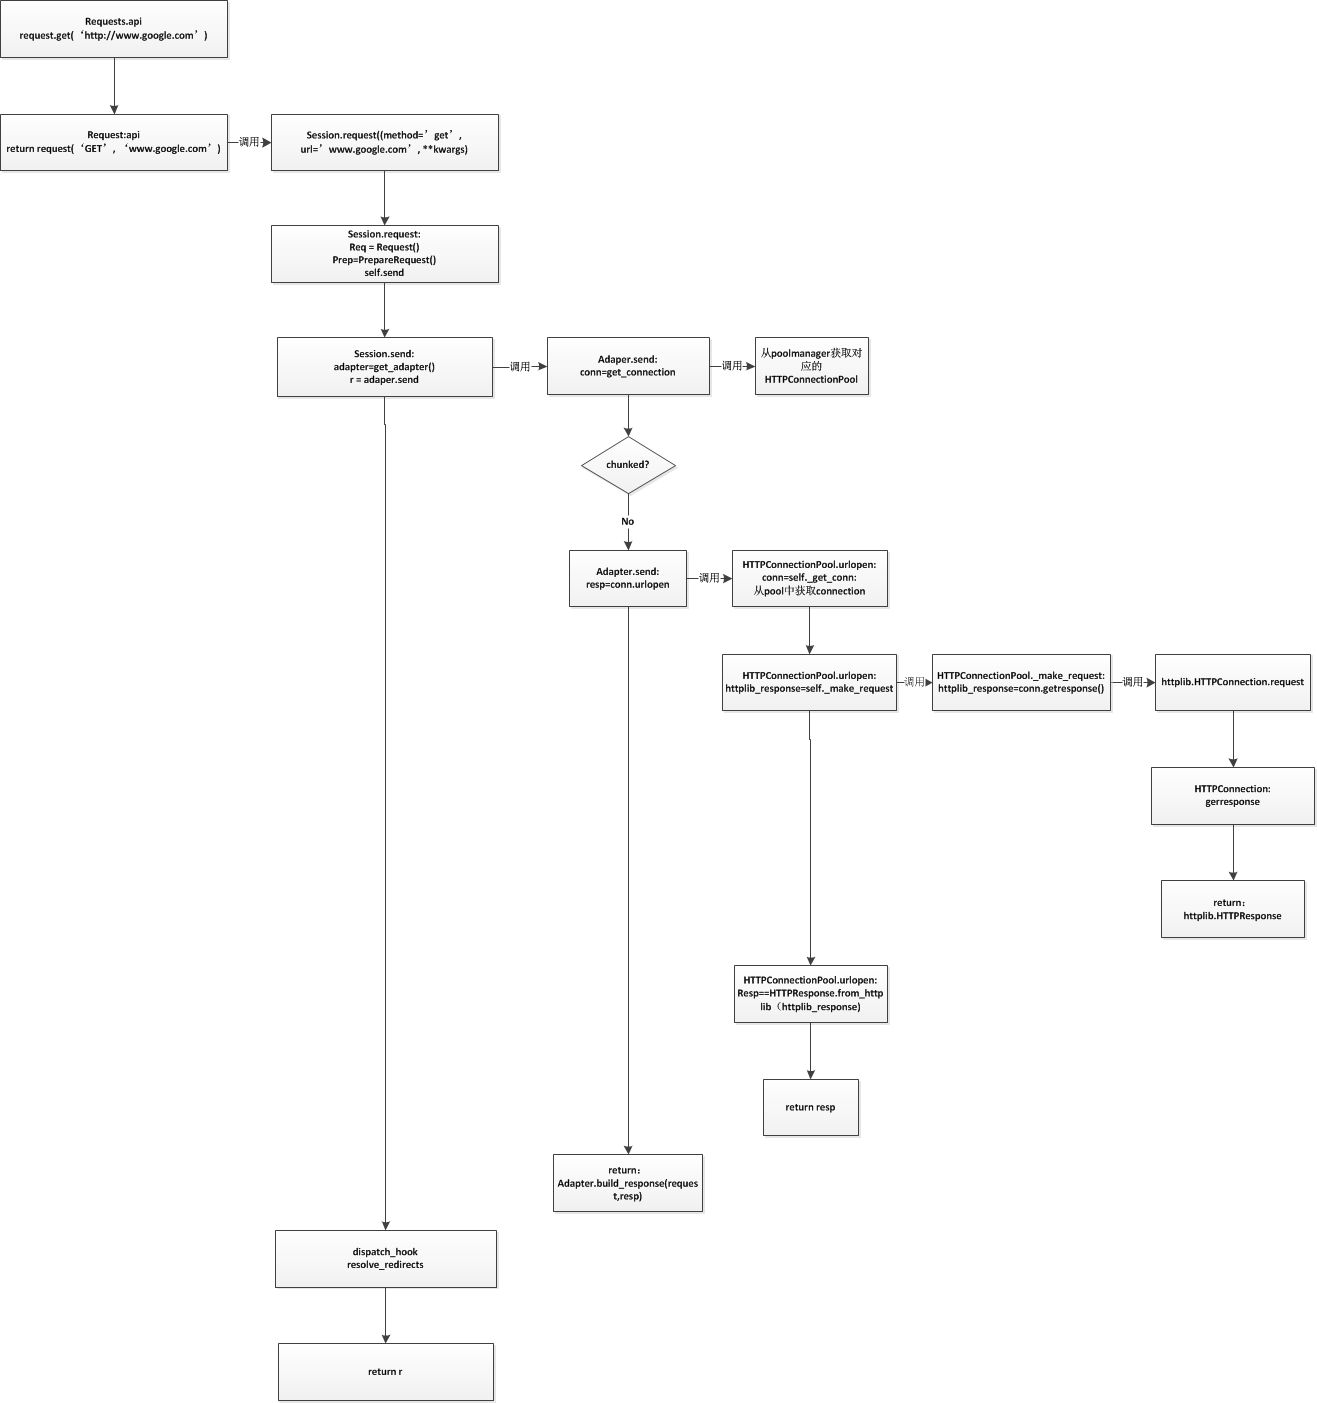
通过之前的流程图知道max_retries参数在HTTPAdapter初始化时设置。可以传递整数或者传递urllib3.util.Retry实例。

1
2
3
4
5
6
7
8
9
10
11
12
13
14
15
16
17
18
19
20
21
22
23
24
25
26
27
28
29
class HTTPAdapter(BaseAdapter):
"""The built-in HTTP Adapter for urllib3.
:param max_retries: The maximum number of retries each connection
should attempt. Note, this applies only to failed DNS lookups, socket
connections and connection timeouts, never to requests where data has
made it to the server. By default, Requests does not retry failed
connections. If you need granular control over the conditions under
which we retry a request, import urllib3's ``Retry`` class and pass
that instead.
Usage::
>>> import requests
>>> s = requests.Session()
>>> a = requests.adapters.HTTPAdapter(max_retries=3)
>>> s.mount('http://', a)
"""
__attrs__ = ['max_retries', 'config', '_pool_connections', '_pool_maxsize',
'_pool_block']
def __init__(self, pool_connections=DEFAULT_POOLSIZE,
pool_maxsize=DEFAULT_POOLSIZE, max_retries=DEFAULT_RETRIES,
pool_block=DEFAULT_POOLBLOCK):
if max_retries == DEFAULT_RETRIES:
self.max_retries = Retry(0, read=False)
else:
self.max_retries = Retry.from_int(max_retries)

Retry的设计比较简单,在HTTPConnectionPool中根据返回的异常和访问方法,区分是那种链接失败(connect? read?),然后减少对应的值即可。然后再判断是否所有的操作重试都归零,归零则报MaxRetries异常即可。不过对于每次重试之间的间隔使用了一个简单的backoff算法。

1
2
3
4
5
6
7
8
9
10
11
12
13
14
15
16
17
18
19
20
21
22
23
24
25
26
27
28
29
30
31
32
33
34
35
36
37
38
39
40
41
42
43
44
45
46
47
48
49
50
51
52
53
54
55
56
57
58
59
60
61
62
63
64
65
66
67
68
69
70
71
72
73
74
75
76
77
78
79
80
81
82
83
84
85
86
87
88
89
90
91
92
93
94
95
96
97
98
99
100
101
102
103
104
105
106
107
108
109
110
111
112
113
114
115
116
117
118
119
120
121
122
123
class Retry(object):
""" Retry configuration.
Each retry attempt will create a new Retry object with updated values, so
they can be safely reused.
Retries can be defined as a default for a pool::
retries = Retry(connect=5, read=2, redirect=5)
http = PoolManager(retries=retries)
response = http.request('GET', 'http://example.com/')
Or per-request (which overrides the default for the pool)::
response = http.request('GET', 'http://example.com/', retries=Retry(10))
Retries can be disabled by passing ``False``::
response = http.request('GET', 'http://example.com/', retries=False)
Errors will be wrapped in :class:`~urllib3.exceptions.MaxRetryError` unless
retries are disabled, in which case the causing exception will be raised.
:param int total:
Total number of retries to allow. Takes precedence over other counts.
Set to ``None`` to remove this constraint and fall back on other
counts. It's a good idea to set this to some sensibly-high value to
account for unexpected edge cases and avoid infinite retry loops.
Set to ``0`` to fail on the first retry.
Set to ``False`` to disable and imply ``raise_on_redirect=False``.
....
:param iterable method_whitelist:
Set of uppercased HTTP method verbs that we should retry on.
By default, we only retry on methods which are considered to be
indempotent (multiple requests with the same parameters end with the
same state). See :attr:`Retry.DEFAULT_METHOD_WHITELIST`.
:param iterable status_forcelist:
A set of HTTP status codes that we should force a retry on.
By default, this is disabled with ``None``.
:param float backoff_factor:
A backoff factor to apply between attempts. urllib3 will sleep for::
{backoff factor} * (2 ^ ({number of total retries} - 1))
seconds. If the backoff_factor is 0.1, then :func:`.sleep` will sleep
for [0.1s, 0.2s, 0.4s, ...] between retries. It will never be longer
than :attr:`Retry.BACKOFF_MAX`.
By default, backoff is disabled (set to 0).
"""
DEFAULT_METHOD_WHITELIST = frozenset([
'HEAD', 'GET', 'PUT', 'DELETE', 'OPTIONS', 'TRACE'])
#: Maximum backoff time.
BACKOFF_MAX = 120
def __init__(self, total=10, connect=None, read=None, redirect=None,
method_whitelist=DEFAULT_METHOD_WHITELIST, status_forcelist=None,
backoff_factor=0, raise_on_redirect=True, raise_on_status=True,
_observed_errors=0):
self.total = total
self.connect = connect
self.read = read
if redirect is False or total is False:
redirect = 0
raise_on_redirect = False
self.redirect = redirect
self.status_forcelist = status_forcelist or set()
self.method_whitelist = method_whitelist
self.backoff_factor = backoff_factor
self.raise_on_redirect = raise_on_redirect
self.raise_on_status = raise_on_status
self._observed_errors = _observed_errors # TODO: use .history instead?
def get_backoff_time(self):
""" Formula for computing the current backoff
:rtype: float
"""
if self._observed_errors <= 1:
return 0
# 重试算法, _observed_erros就是第几次重试,每次失败这个值就+1.
# backoff_factor = 0.1, 重试的间隔为[0.1, 0.2, 0.4, 0.8, ..., BACKOFF_MAX(120)]
backoff_value = self.backoff_factor * (2 ** (self._observed_errors - 1))
return min(self.BACKOFF_MAX, backoff_value)
def sleep(self):
""" Sleep between retry attempts using an exponential backoff.
By default, the backoff factor is 0 and this method will return
immediately.
"""
backoff = self.get_backoff_time()
if backoff <= 0:
return
time.sleep(backoff)
def is_forced_retry(self, method, status_code):
""" Is this method/status code retryable? (Based on method/codes whitelists)
"""
if self.method_whitelist and method.upper() not in self.method_whitelist:
return False
return self.status_forcelist and status_code in self.status_forcelist
# For backwards compatibility (equivalent to pre-v1.9):
Retry.DEFAULT = Retry(3)

使用重试有几点需要注意:

  • 如果使用requests.get等简单形式,默认会重试3次
  • 重试只有在DNS解析错误、链接错误、链接超时等异常是才重试。在比如读取超时、写超时、HTTP协议错误等不会重试
  • 使用重试会导致返回的错误为MaxRetriesError,而不是确切的异常。

requests库源码剖析

发表于 2016-07-29   |   分类于 python , requests   |  

requests: HTTP for humans


requests以简洁、human-friendly著称,谁用谁知道。本文从源码角度剖析requests,先从数据结构入手,再到整个HTTP访问流程,然后着重讲解requests中用于处理netrc、redirects、cache等用到的技术。

requests的数据结构图


先来个最简单的使用例子:

1
2
3
4
5
6
7
8
9
10
11
12
13
14
resp = requests.get('http://www.baidu.com')
Out[75]
resp.status_code
Out[76]: 200
resp.content[:10]
Out[77]: '<!DOCTYPE '
resp.headers['content-type']
Out[79]: 'text/html; charset=utf-8'
resp.reason
Out[80]: 'OK'

为了便于探寻requests中的数据结构再稍微复杂点:

1
2
3
4
5
6
7
8
9
10
11
12
13
import requests
session=requests.Session()
out[2]:
session.get('http://www.baidu.com')
Out[3]: <Response [200]>
session.get('https://www.baidu.com')
Out[4]: <Response [200]>
session.get('http://www.sina.com')
Out[5]: <Response [200]>

实例化一个Session,然后访问多次,因此可以让requests本身进行缓存等操作,其对应的总体结构图如下:

image

requests使用了2层缓存技术:

  • 第一层poolmanager缓存HTTPConnectionPool。poolmanager缓存多个链接池,以(scheme, host, port)作为key。该缓存是一个RecentlyUsedContainer(底层使用的OrderedDict),当需要缓存的缓存池过多时淘汰最老的HTTPConnectionPool。最大缓存数量可以通过参数pool_maxsize设定,默认为requests.adapters.DEFAULT_POOLSIZE 10个。另外这也是第二层缓存中默认的最大缓存链接的个数。

  • 第二层HTTPConnectionPool缓存HTTPConnection。HTTPConnectionPool缓存多个链接。该缓存底层使用LifoQueue后入先出队列,尽量重复使用同一个链接。最大的缓存数量默认也是10个。不过有一个特殊的参数block需要注意,当其为True时 HTTPConnectionPool对同一个(scheme, host, port)的访问建立的最多链接数量即为最大缓存数量,获取链接时需要堵塞等待空闲的链接。

requests的操作流程


我们从最简单的get操作入手,看一看整个流程是如何完成的,其流程图如下

image

流程中需要注意,对于每层函数来说其中的conn都指的是下层数据结构(实例)。HTTPAdapter中的conn对应的数据结构是HTTPConnectionPool;HTTPConnectionPool中的conn是HTTPConnection;HTTPCOnnection中的conn是socket。

OpenStack之Eventlet

发表于 2016-02-27   |   分类于 OpenStack   |  

Eventlet的Hub


所有基于epoll(多路复用)的框架,总有一个事件循环处理中心,一般称为Hub。Eventlet中的Hub不仅是所有事件监听和处理的中心,也是greenlet调度的中心。下面看看Hub的事件处理逻辑。

1
2
3
4
5
6
7
8
9
10
11
12
13
14
15
16
17
18
19
20
21
22
23
24
25
26
27
28
29
30
31
32
33
34
35
36
37
38
39
40
41
42
43
44
45
46
47
# eventlet/hubs/hub.py
# BaseHub
def run(self, *a, **kw):
"""Run the runloop until abort is called.
"""
# accept and discard variable arguments because they will be
# supplied if other greenlets have run and exited before the
# hub's greenlet gets a chance to run
if self.running:
raise RuntimeError("Already running!")
try:
self.running = True
self.stopping = False
while not self.stopping:
# 由于垃圾回收,fd可能重新使用,在重新使用的时候通过`mark_as_reopend` -> `_obsolete`
# 将原来可能存在的监听事件删除。并且将对应的监听事件回调的tb设置为IOClosed异常。
while self.closed:
# We ditch all of these first.
self.close_one()
# 将timer按照到期时间排序
self.prepare_timers()
if self.debug_blocking:
self.block_detect_pre()
# 触发定时的事件
self.fire_timers(self.clock())
if self.debug_blocking:
self.block_detect_post()
# 将剩下的没有触发的定时事件排序,主要是为了后面找到sleep的时长
self.prepare_timers()
# wait的时间,取最快到期的定时事件的时间戳
wakeup_when = self.sleep_until()
if wakeup_when is None:
sleep_time = self.default_sleep()
else:
sleep_time = wakeup_when - self.clock()
if sleep_time > 0:
# 由具体的平台决定实现(epoll)
self.wait(sleep_time)
else:
self.wait(0)
else:
self.timers_canceled = 0
del self.timers[:]
del self.next_timers[:]
finally:
self.running = False
self.stopping = False

定时事件

总体来说,Hub处理两件事件。第一类是定时事件,每次循环中处理到期的事件。上面我们可以看到,Hub每次循环将next_timer中的定时事件进行排序,然后处理到期的定时事件。那么定时事件是如何添加到Hub中的呢?

1
2
3
4
5
6
7
8
9
10
11
12
13
14
15
16
17
18
19
20
21
22
23
24
25
26
27
28
29
30
31
# eventlet/hubs/hub.py
class BaseHub(object):
def add_timer(self, timer):
scheduled_time = self.clock() + timer.seconds
self.next_timers.append((scheduled_time, timer))
return scheduled_time
# eventlet/hubs/timer.py
class Timer(object):
def __init__(self, seconds, cb, *args, **kw):
"""Create a timer.
seconds: The minimum number of seconds to wait before calling
cb: The callback to call when the timer has expired
*args: The arguments to pass to cb
**kw: The keyword arguments to pass to cb
This timer will not be run unless it is scheduled in a runloop by
calling timer.schedule() or runloop.add_timer(timer).
"""
self.seconds = seconds
self.tpl = cb, args, kw
self.called = False
if _g_debug:
self.traceback = six.StringIO()
traceback.print_stack(file=self.traceback)
# 按照id的大小进行排序
def __lt__(self, other):
return id(self) < id(other)

通过add_timer函数,将Timer的实例加入next_timers列表中。注意Timer中的时间是到期的相对时间长度,而Hub中记录的是绝对时间戳,因此add_timer做了一个转换。定时事件处理的逻辑:

  • 每次循环处理到期的定时事件
  • 处理的顺序按照到期的事件由小到大处理
  • 相同时间戳的事件按照添加的顺序(内存id)从小到大处理

监听事件

1
2
3
4
5
6
7
8
9
10
11
12
13
14
15
16
17
18
19
20
21
22
23
24
25
26
27
28
29
30
31
32
33
34
35
36
37
38
39
40
41
42
43
44
45
46
47
48
49
50
51
52
53
54
# eventlet/hubs/poll.py
def wait(self, seconds=None):
readers = self.listeners[READ]
writers = self.listeners[WRITE]
# 如果没有监听的事件,就休眠到第一个定时事件到期
if not readers and not writers:
if seconds:
sleep(seconds)
return
try:
# 进行poll, 对应python的epoll.poll和C语言的epoll_wait
presult = self.do_poll(seconds)
except (IOError, select.error) as e:
if get_errno(e) == errno.EINTR:
return
raise
SYSTEM_EXCEPTIONS = self.SYSTEM_EXCEPTIONS
if self.debug_blocking:
self.block_detect_pre()
# Accumulate the listeners to call back to prior to
# triggering any of them. This is to keep the set
# of callbacks in sync with the events we've just
# polled for. It prevents one handler from invalidating
# another.
# 处理满足监听条件的事件,执行对应的回调函数。
# 如果不满足条件(例如,监听socket读事件但是当前socket不可读),则对应的fileno,event不会在presult中
callbacks = set()
for fileno, event in presult:
if event & READ_MASK:
callbacks.add((readers.get(fileno, noop), fileno))
if event & WRITE_MASK:
callbacks.add((writers.get(fileno, noop), fileno))
if event & select.POLLNVAL:
self.remove_descriptor(fileno)
continue
if event & EXC_MASK:
callbacks.add((readers.get(fileno, noop), fileno))
callbacks.add((writers.get(fileno, noop), fileno))
# 依次执行回调。因为epoll会按照fileno的大小排序返回,因此执行回调也是按照从小到大的顺序
for listener, fileno in callbacks:
try:
listener.cb(fileno)
except SYSTEM_EXCEPTIONS:
raise
except:
self.squelch_exception(fileno, sys.exc_info())
clear_sys_exc_info()
if self.debug_blocking:
self.block_detect_post()

可以看到,对第二类监听事件的处理是通过epoll,每次循环返回一批满足条件的事件,然后依次执行回调函数。那么,监听事件是如何添加到Hub中的呢?

1
2
3
4
5
6
7
8
9
10
11
12
13
14
15
16
17
18
19
20
21
22
23
24
25
26
27
28
29
30
31
32
33
34
35
36
37
38
39
40
41
42
43
44
45
46
47
48
49
50
51
52
53
54
55
56
57
58
59
60
61
62
63
64
65
66
67
68
69
70
71
72
73
74
75
# eventlet/hubs/epoll.py
class Hub(poll.Hub):
def __init__(self, clock=time.time):
BaseHub.__init__(self, clock)
self.poll = epoll()
try:
# modify is required by select.epoll
self.modify = self.poll.modify
except AttributeError:
self.modify = self.poll.register
def add(self, evtype, fileno, cb, tb, mac):
oldlisteners = bool(self.listeners[READ].get(fileno) or
self.listeners[WRITE].get(fileno))
# 添加监听事件到listeners或者writers中
# 注意这里调用的是BaseHub.add, 直接绕过了poll.py中的Hub.add
listener = BaseHub.add(self, evtype, fileno, cb, tb, mac)
try:
if not oldlisteners:
# Means we've added a new listener
self.register(fileno, new=True)
else:
# 注册监听的事件到 epoll上,相当于epoll_register
self.register(fileno, new=False)
except IOError as ex: # ignore EEXIST, #80
if get_errno(ex) != errno.EEXIST:
raise
return listener
# eventlet/hubs/hub.py
class BaseHub(object):
def add(self, evtype, fileno, cb, tb, mark_as_closed):
""" Signals an intent to or write a particular file descriptor.
The *evtype* argument is either the constant READ or WRITE.
The *fileno* argument is the file number of the file of interest.
The *cb* argument is the callback which will be called when the file
is ready for reading/writing.
The *tb* argument is the throwback used to signal (into the greenlet)
that the file was closed.
The *mark_as_closed* is used in the context of the event hub to
prepare a Python object as being closed, pre-empting further
close operations from accidentally shutting down the wrong OS thread.
"""
# 初始化一个listener实例,这个实例保存监听的事件类型evtype、监听fd、回调函数cb,异常tb等
# 最后将这 listener 按照类型放到 self.listeners中
# self.listeners = {'READ': {1:listener1, 2:listener2}, 'WRITE': {3: listener3, ..}}
listener = self.lclass(evtype, fileno, cb, tb, mark_as_closed)
bucket = self.listeners[evtype]
if fileno in bucket:
if g_prevent_multiple_readers:
raise RuntimeError(
"Second simultaneous %s on fileno %s "
"detected. Unless you really know what you're doing, "
"make sure that only one greenthread can %s any "
"particular socket. Consider using a pools.Pool. "
"If you do know what you're doing and want to disable "
"this error, call "
"eventlet.debug.hub_prevent_multiple_readers(False) - MY THREAD=%s; "
"THAT THREAD=%s" % (
evtype, fileno, evtype, cb, bucket[fileno]))
# store off the second listener in another structure
self.secondaries[evtype].setdefault(fileno, []).append(listener)
else:
bucket[fileno] = listener
return listener

通过继承链Hub->BaseHub,将监听事件添加到epoll中并且在每次循环中处理满足监听条件的事件,执行回调函数。我们知道,greenlet本身是不负责调度的,所有的调度需要由应用程序负责,那么eventlet如何进行程序的调度?我们先从eventlet定义的协程说起。

Eventlet的GreenThread

Eventlet通过继承greenlet.geenlet自定义了一个绿色线程,实际上是一个协程。Eventlet扩展了greenlet.greenlet的语义:

  • wait, 当被调用时会自动切换到其他协程上去,条件满足时再切回来
  • link, 注册协程退出时执行的清理函数
  • kill, 杀掉协程,但是在杀掉之前执行一次调度
1
2
3
4
5
6
7
8
9
10
11
12
13
14
15
16
17
18
19
20
21
22
23
24
25
26
27
28
29
30
31
32
33
34
35
36
37
38
39
40
41
42
43
44
45
46
47
48
49
50
51
52
53
54
55
56
57
58
59
60
61
62
63
64
65
66
67
68
69
70
71
72
73
74
75
76
77
78
79
80
81
82
83
84
85
86
87
88
89
90
91
92
93
# eventlet/greenthread.py
class GreenThread(greenlet.greenlet):
"""The GreenThread class is a type of Greenlet which has the additional
property of being able to retrieve the return value of the main function.
Do not construct GreenThread objects directly; call :func:`spawn` to get one.
"""
def __init__(self, parent):
greenlet.greenlet.__init__(self, self.main, parent)
self._exit_event = event.Event()
self._resolving_links = False
def wait(self):
""" Returns the result of the main function of this GreenThread. If the
result is a normal return value, :meth:`wait` returns it. If it raised
an exception, :meth:`wait` will raise the same exception (though the
stack trace will unavoidably contain some frames from within the
greenthread module)."""
return self._exit_event.wait()
def link(self, func, *curried_args, **curried_kwargs):
""" Set up a function to be called with the results of the GreenThread.
The function must have the following signature::
def func(gt, [curried args/kwargs]):
When the GreenThread finishes its run, it calls *func* with itself
and with the `curried arguments <http://en.wikipedia.org/wiki/Currying>`_ supplied
at link-time. If the function wants to retrieve the result of the GreenThread,
it should call wait() on its first argument.
Note that *func* is called within execution context of
the GreenThread, so it is possible to interfere with other linked
functions by doing things like switching explicitly to another
greenthread.
"""
self._exit_funcs = getattr(self, '_exit_funcs', deque())
self._exit_funcs.append((func, curried_args, curried_kwargs))
if self._exit_event.ready():
self._resolve_links()
def unlink(self, func, *curried_args, **curried_kwargs):
""" remove linked function set by :meth:`link`
Remove successfully return True, otherwise False
"""
if not getattr(self, '_exit_funcs', None):
return False
try:
self._exit_funcs.remove((func, curried_args, curried_kwargs))
return True
except ValueError:
return False
def main(self, function, args, kwargs):
try:
result = function(*args, **kwargs)
except:
self._exit_event.send_exception(*sys.exc_info())
self._resolve_links()
raise
else:
self._exit_event.send(result)
self._resolve_links()
def _resolve_links(self):
# ca and ckw are the curried function arguments
if self._resolving_links:
return
self._resolving_links = True
try:
exit_funcs = getattr(self, '_exit_funcs', deque())
while exit_funcs:
f, ca, ckw = exit_funcs.popleft()
f(self, *ca, **ckw)
finally:
self._resolving_links = False
def kill(self, *throw_args):
"""Kills the greenthread using :func:`kill`. After being killed
all calls to :meth:`wait` will raise *throw_args* (which default
to :class:`greenlet.GreenletExit`)."""
return kill(self, *throw_args)
def cancel(self, *throw_args):
"""Kills the greenthread using :func:`kill`, but only if it hasn't
already started running. After being canceled,
all calls to :meth:`wait` will raise *throw_args* (which default
to :class:`greenlet.GreenletExit`)."""
return cancel(self, *throw_args)

使用协程的入口spawn和spawn_n

一般使用eventlet会有两个入口函数:

  • spawn, eventlet.spawn ->eventlet.greenthread.spawn, 创建一个绿色线程并且返回这个绿色协程,并安排调度执行。
  • spawn_n, eventlet.spawn_n ->eventlet.greenthread.spawn_n, 创建一个greenlet,并返回,同时安排调度执行。

spawn使用了自己的GreenThread,而spawn_n使用的是greenlet,因而后者更加快速一点。

1
2
3
4
5
6
7
8
9
10
11
12
13
14
15
16
17
18
19
20
21
22
23
24
25
26
27
28
29
30
31
32
33
34
35
# eventlet/greenthread.py
def spawn(func, *args, **kwargs):
"""Create a greenthread to run ``func(*args, **kwargs)``. Returns a
:class:`GreenThread` object which you can use to get the results of the
call.
Execution control returns immediately to the caller; the created greenthread
is merely scheduled to be run at the next available opportunity.
Use :func:`spawn_after` to arrange for greenthreads to be spawned
after a finite delay.
"""
hub = hubs.get_hub()
g = GreenThread(hub.greenlet)
hub.schedule_call_global(0, g.switch, func, args, kwargs)
return g
def spawn_n(func, *args, **kwargs):
"""Same as :func:`spawn`, but returns a ``greenlet`` object from
which it is not possible to retrieve either a return value or
whether it raised any exceptions. This is faster than
:func:`spawn`; it is fastest if there are no keyword arguments.
If an exception is raised in the function, spawn_n prints a stack
trace; the print can be disabled by calling
:func:`eventlet.debug.hub_exceptions` with False.
"""
return _spawn_n(0, func, args, kwargs)[1]
def _spawn_n(seconds, func, args, kwargs):
hub = hubs.get_hub()
g = greenlet.greenlet(func, parent=hub.greenlet)
t = hub.schedule_call_global(seconds, g.switch, *args, **kwargs)
return t, g

可以看到两个都调用了schedule_call_global然后返回。这个函数会安排绿色协程的调度。

绿色线程如何调度

在创建GreenThread时,会通过调用不同的Hub方法进行调度,在linux环境下两个函数一样,就以上面说到的schedule_call_global为例说明。

1
2
3
4
5
6
7
8
9
10
11
12
13
14
15
# eventlet/hubs/poll.py
# BaseHub
def schedule_call_global(self, seconds, cb, *args, **kw):
"""Schedule a callable to be called after 'seconds' seconds have
elapsed. The timer will NOT be canceled if the current greenlet has
exited before the timer fires.
seconds: The number of seconds to wait.
cb: The callable to call after the given time.
*args: Arguments to pass to the callable when called.
**kw: Keyword arguments to pass to the callable when called.
"""
t = timer.Timer(seconds, cb, *args, **kw)
self.add_timer(t)
return t

可以看到,当创建绿色线程时通过调用scheduler_call_global方法,然后再设置定时任务的方式添加入Hub进行调度。每个seconds=0,即在每次循环处理定时任务的时候处理。一直到这里,并没有谈到监听事件是何时注册到epoll进行监听的。我们通过socket创建和监听为例,看一下整个过程是如何的。

socket如何创建、设置、注册和监听

原生的实现不兼容eventlet,所以eventlet对一些标准库进行了绿化。用自己的实现替代了原生的实现。这里的不兼容主要体现在两点:

  • 需要将堵塞模式设置为非堵塞,不然多路复用没有意义
  • 需要将fd添加到epoll中进行监听,并且在满足条件下调度执行

通过GreenSocket实现探查下如何解决上面两个问题:

1
eventlet.green.socket -> eventlet._socket_nodns -> eventlet.greenio.base ->GreenSocket。
1
2
3
4
5
6
7
8
9
10
11
12
13
14
15
16
17
18
19
20
21
22
23
24
25
26
27
28
29
30
31
32
33
34
35
36
37
38
39
40
41
42
43
44
45
46
47
48
49
50
51
52
53
54
55
56
57
58
59
60
61
62
63
64
65
66
67
68
69
70
71
72
73
74
75
76
77
78
79
80
81
82
83
84
85
86
87
88
89
90
91
92
93
94
95
96
97
98
99
100
101
102
103
104
105
106
107
108
109
110
111
112
113
114
115
116
117
118
119
120
121
122
123
124
125
126
127
128
129
130
131
132
133
134
135
136
137
138
139
140
141
142
143
144
145
146
147
148
149
150
151
152
153
154
155
156
157
# eventlet/greenio/base.py
class GreenSocket(object):
"""
Green version of socket.socket class, that is intended to be 100%
API-compatible.
It also recognizes the keyword parameter, 'set_nonblocking=True'.
Pass False to indicate that socket is already in non-blocking mode
to save syscalls.
"""
# This placeholder is to prevent __getattr__ from creating an infinite call loop
fd = None
def __init__(self, family_or_realsock=socket.AF_INET, *args, **kwargs):
should_set_nonblocking = kwargs.pop('set_nonblocking', True)
if isinstance(family_or_realsock, six.integer_types):
# 创建原生的socket 或者包装已有的socket
fd = _original_socket(family_or_realsock, *args, **kwargs)
# Notify the hub that this is a newly-opened socket.
# 这是个新打开的fd,如果之前有监听的事件删除之
notify_opened(fd.fileno())
else:
fd = family_or_realsock
# import timeout from other socket, if it was there
try:
self._timeout = fd.gettimeout() or socket.getdefaulttimeout()
except AttributeError:
self._timeout = socket.getdefaulttimeout()
# 设置为非堵塞模式,需要注意set_nonblocking这个参数的意思是 传入的socket已经是非堵塞的了,不需要额外的设置。
if should_set_nonblocking:
set_nonblocking(fd)
self.fd = fd
# when client calls setblocking(0) or settimeout(0) the socket must
# act non-blocking
self.act_non_blocking = False
# Copy some attributes from underlying real socket.
# This is the easiest way that i found to fix
# https://bitbucket.org/eventlet/eventlet/issue/136
# Only `getsockopt` is required to fix that issue, others
# are just premature optimization to save __getattr__ call.
self.bind = fd.bind
self.close = fd.close
self.fileno = fd.fileno
self.getsockname = fd.getsockname
self.getsockopt = fd.getsockopt
self.listen = fd.listen
self.setsockopt = fd.setsockopt
self.shutdown = fd.shutdown
self._closed = False
def _trampoline(self, fd, read=False, write=False, timeout=None, timeout_exc=None):
""" We need to trampoline via the event hub.
We catch any signal back from the hub indicating that the operation we
were waiting on was associated with a filehandle that's since been
invalidated.
"""
# 处理已经closed的情况
if self._closed:
# If we did any logging, alerting to a second trampoline attempt on a closed
# socket here would be useful.
raise IOClosed()
try:
return trampoline(fd, read=read, write=write, timeout=timeout,
timeout_exc=timeout_exc,
mark_as_closed=self._mark_as_closed)
except IOClosed:
# This socket's been obsoleted. De-fang it.
self._mark_as_closed()
raise
def accept(self):
if self.act_non_blocking:
return self.fd.accept()
fd = self.fd
while True:
# 非堵塞的读取,如果返回errno.EWOULDBLOCK异常,返回None
res = socket_accept(fd)
# 返回正常可读,设置client为非堵塞,然后绿化之
if res is not None:
client, addr = res
set_nonblocking(client)
return type(self)(client), addr
# 对方可能堵塞了,先垫一下(trampoline弹簧垫的意思)
self._trampoline(fd, read=True, timeout=self.gettimeout(),
timeout_exc=socket.timeout("timed out"))
def socket_accept(descriptor):
"""
Attempts to accept() on the descriptor, returns a client,address tuple
if it succeeds; returns None if it needs to trampoline, and raises
any exceptions.
"""
try:
return descriptor.accept()
except socket.error as e:
if get_errno(e) == errno.EWOULDBLOCK:
return None
raise
def trampoline(fd, read=None, write=None, timeout=None,
timeout_exc=timeout.Timeout,
mark_as_closed=None):
"""Suspend the current coroutine until the given socket object or file
descriptor is ready to *read*, ready to *write*, or the specified
*timeout* elapses, depending on arguments specified.
To wait for *fd* to be ready to read, pass *read* ``=True``; ready to
write, pass *write* ``=True``. To specify a timeout, pass the *timeout*
argument in seconds.
If the specified *timeout* elapses before the socket is ready to read or
write, *timeout_exc* will be raised instead of ``trampoline()``
returning normally.
.. note :: |internal|
"""
t = None
hub = get_hub()
current = greenlet.getcurrent()
assert hub.greenlet is not current, 'do not call blocking functions from the mainloop'
assert not (
read and write), 'not allowed to trampoline for reading and writing'
try:
fileno = fd.fileno()
except AttributeError:
fileno = fd
# 如果设置了超时时间,定义一个超时的定时事件,从而greenlet.throw产生超时异常
if timeout is not None:
def _timeout(exc):
# This is only useful to insert debugging
current.throw(exc)
t = hub.schedule_call_global(timeout, _timeout, timeout_exc)
# 根据读写任务类型,添加到Hub中进行监听。回调函数是current.switch。即如果某个绿色线程监听的事件满足条件
# 就在每个Hub循环中通过current.switch切回本绿色线程继续处理,直到处理完毕或者绿色线程主动让出处理
try:
if read:
listener = hub.add(hub.READ, fileno, current.switch, current.throw, mark_as_closed)
elif write:
listener = hub.add(hub.WRITE, fileno, current.switch, current.throw, mark_as_closed)
try:
# 已经注册了监听事件,切回Hub中的绿色线程处理
return hub.switch()
finally:
# finally能够运行,说明监听条件满足了,从监听中移除该事件。
hub.remove(listener)
finally:
if t is not None:
t.cancel()

从上面的代码可以看到,使用了绿色线程的执行步骤是:

1
2
开始 ->初始化原生socket ->设置为非堵塞模式 -> accept ->返回堵塞异常 ->trampline将socket添加到Hub进行监听 ->切回Hub线程运行
->每次的Hub循环 ->epoll条件满足执行current.switch切回本线程 -> 进行accept操作正常 -> 绿化返回的client端socket ->结束

因此,我们可以知道eventlet解决上面两个问题的方法:

  • 封装原生socket,设置为非堵塞模式
  • 在accept返回失败时,通过trampoline将其添加到Hub进行事件监听。

eventlet的绿化逻辑

可以归纳出eventlet的大致处理逻辑:

  1. 调用spawn类函数创建一个绿色线程,通过Timer提交给Hub,并将switch函数设置为回调。在每次Hub循环处理Timer时,执行switch切回绿色线程运行;
  2. 通过绿化原生标准库,设置fd为非堵塞模式;在运行非堵塞accept、read、write等失败时trampoline,从而添加到hub中进行事件监听。等待下次Hub循环时通过epoll检查条件是否满足,然后再切换回绿色线程进行对应的操作。

Evenlet的基础greenlet

发表于 2015-12-14   |   分类于 OpenStack   |  

Eventlet的基础


用官方的开场白介绍eventlet。eventlet是一个python并发(concurrent)网络库,能够在不改变编程方式的情况下,改变程序的运行方式。

  • 使用epoll\kequeue\libevent实现高伸缩性的非堵塞I/O。
  • 依靠协程(coroutines),可以类似threading库那样采用堵塞式的编程模型,反而获得非堵塞I/O的收益。
  • 事件的分发(dispatch)是隐含式的,因此可以容易从底层使用Eventlet库,或者是作为大型程序的一个部分。

在我的理解中,Eventlet的神奇之处在于两点:

  • 不改变编程模型,虽然底层是异步I/O,但是可以像堵塞式那样正常的编程,没有大量的嵌套回调。
  • 对于I/O事件是隐式分发的,就像使用threading库那样、甚至说比之还要方便;也无需大量的显式的协程调用,这点可以和tornado对比。

eventlet的底层greenlet

说起eventlet总也离不开其底层依赖的greenlet这个Python的协程库。这里不讨论greenlet的实现,只强调greenlet的几个特性。

协程的意思就是相互协助的程序。它与线程的区别是,协程之间的运行顺序是由程序本身确定的,而不是由内核决定;协程拥有自己独立的栈,可以随时终止和继续运行。

下面先提供一个实际的例子,然后分析greenlet的几个接口,再回过头说明这个例子的输出。

1
2
3
4
5
6
7
8
9
10
11
12
13
14
15
16
17
18
19
20
21
22
23
24
25
26
27
28
29
30
31
32
33
34
35
36
37
38
39
40
41
42
43
44
45
46
47
48
49
50
51
52
53
54
55
56
57
58
59
60
61
62
import time
import greenlet
all_g = {}
def format_print(*args): # 打印当前协程、父协程、输出
global all_g
current = greenlet.getcurrent()
print 'greenlet(%s), parent(%s): %s' % (
all_g[id(current)],
all_g[id(current.parent)],
' '.join(map(str, args)))
def run1(start):
format_print('g1 begin, start', start)
for i in range(2): # 注意这里是循环2次
time.sleep(1)
start += 1
start = g2.switch(start)
format_print('start', start)
format_print('g1 end, start', start)
def run2(start):
format_print('g2 begin, start', start)
for i in range(3): # 注意这里循环3次
time.sleep(1)
start += 1
start = g1.switch(start)
format_print('start', start)
format_print('g2 end, start', start)
def run3(num):
format_print('g3 begin, num', num)
for i in range(num):
format_print('i', i)
time.sleep(1)
end = g2.switch(num+100)
format_print('g3 end', end)
g1 = greenlet.greenlet(run=run1, parent=greenlet.getcurrent())
g2 = greenlet.greenlet(run=run2, parent=greenlet.getcurrent())
g3 = greenlet.greenlet(run=run3, parent=g2)
all_g[id(None)] = 'main'
all_g[id(greenlet.getcurrent())] = 'main'
all_g[id(g1)] = 'g1'
all_g[id(g2)] = 'g2'
all_g[id(g3)] = 'g3'
g1.switch(0)
format_print('back main after g1.switch')
g3.switch(3)
format_print('back main after g3.switch')
format_print(g1.switch('back g1 from main'))
format_print(g3.switch('back g3 from main'))

greenlet.greenlet

1
2
3
4
greenlet.greenlet(run=None, parent=None) => greenlet object
run: 传入需要运行的函数,与`Thread`中的`target`相同
parent: 转入协程的父协程,默认为当前协程

父协程有什么用?

父协程可以通过调用greenlet.getcurrent().parent得到,那么这里传入父协程有什么用处?

简单的来说,父协程最大的用处在于,当前协程运行退出后,自动切换到父协程运行。换句话说,如果parent=None那么创建的协程退出后将自动切回到创建该协程的调用者中运行。

1
2
3
4
5
6
7
8
9
10
11
12
def run(*args, **kwargs):
print args, kwargs
print 'run over'
parent = greenlet.greenlet(run=run)
child = greenlet.greenlet(run=run, parent=parent)
child.switch()
>>
(), {}
run over
(None,), {}
run over

我们可以看到child的参数和运行结束。然后自动切换到了父协程中运行。需要注意的是,当子线程运行结束自动切换到父协程时,会自动专递一个None参数。

为什么子协程退出切换到父协程时专递一个None参数

1
2
3
4
5
6
7
8
9
10
11
12
13
14
15
16
17
18
def run_child(*args):
print args
print 'child over'
def run_parent(*args):
print args
rv = child.switch('hi, child')
print 'Parent continue with:', rv
parent = greenlet.greenlet(run=run_parent)
child = greenlet.greenlet(run=run_child, parent=parent)
parent.switch()
>>>
()
('hi, child',)
child over
Parent continue with: None

我们可以看到,当子协程自然退出后,父协程通过switch获得了None参数。想一想,如果子协程不传递None参数,那么父协程就需要在switch处报错了。

如果一个协程永远不被调用switch会怎么样

一个协程如果没有被调用switch,那么他就永远不能运行。这点和线程完全不同,线程由内核调度,如果主线程自然退出,那么其他线程依然运行(非daemon的线程)。但是,在协程里如果主协程退出,或者进程在其他协程中退出,那么整个程序退出,其他协程没有运行的机会了。看一个官方的例子:

1
2
3
4
5
6
7
8
9
10
11
12
13
14
15
16
17
18
def run_g1():
print 1, 2
g2.switch()
print 5, 6
def run_g2():
print 3, 4
g1.switch()
print 7, 8
g1 = greenlet.greenlet(run=run_g1)
g2 = greenlet.greenlet(run=run_g2)
g1.switch()
>>>
1, 2
3, 4
5, 6 # 结束

我们看到7, 8没有输出,因为g1的父协程是主协程,当g1运行结束后,自动切换到主协程,而主协程没有做任何动作就退出了。

greenlet.switch

1
2
3
greenlet.switch(*args, **kargs)
args: 不定参数
kwargs: 位置参数

greenlet.switch会导致程序切换到被调用的协程中运行。例如前几个例子中的child.switch()会切换到child协程中运行。

协程如何继续运行?

当g.switch被调用时,g在何处继续运行有三种情况:

  • 第一种情况,g没有运行,那么g在run入口处运行。传递的参数作为run的参数。
  • 第二种情况,g已经运行过,那么g在上次运行停止,也就是调用了otehr.switch而被切换出去的地方继续运行。
  • 第三种情况,g已经运行退出。那么g会直接返回,如果有参数传递,则直接返回参数
1
2
3
4
5
6
7
8
9
10
11
12
13
14
15
def run():
print 'over'
g = greenlet.greenlet(run=run)
print g.dead
print g.switch()
print g.dead
print g.switch(1, 2)
print g.switch()
>>>
False
over
True
(1, 2)
()

这里需要注意,当调用已经结束的协程时,会直接返回传递的参数或者是(),而不是之前的None。

greenlet.throw

1
2
3
4
5
greenlet.throw([type, [val, [tb]]])
type: 异常类型,例如TypeError 之类
val: 传递给type的参数,例如‘type is not correct’
tb: 传递给type的参数,异常的栈。

throw调用类似switch调用,会立即转到调用的线程运行,并立即抛出异常,类似:

1
2
3
4
def raiser():
raise typ, val, tb
g_raiser = greenlet(raiser, parent=g)
g_raiser.switch()

如果throw没有参数,那么协程会抛出greenlet.GreenletExit。这个异常不会向上传递给父协程,相当于正常的退出。

1
2
3
4
5
6
7
8
9
10
11
12
13
14
def run():
try:
greenlet.getcurrent().parent.switch()
except greenlet.GreenletExit:
print 'exit'
raise # raise IOError 加入抛出其他异常,对比抛出GreenletExit
g = greenlet.greenlet(run=run)
g.switch()
ge = g.throw() #
print type(ge)
>>>
exit
greenlet.GreenletExit

需要注意到,子协程内部产生异常,从而打印exit。父协程获取到了子协程抛出的异常作为返回值,而不是继续抛出异常。所以,调用throw()是安全中断协程的方法。

第一个例子的输出

1
2
3
4
5
6
7
8
9
10
11
12
13
14
15
16
17
18
greenlet(g1), parent(main): g1 begin, start 0
greenlet(g2), parent(main): g2 begin, start 1
greenlet(g1), parent(main): start 2
greenlet(g2), parent(main): start 3
greenlet(g1), parent(main): start 4
greenlet(g1), parent(main): g1 end, start 4 # g1运行结束,转到父协程(main)中运行
greenlet(main), parent(main): back main after g1.switch
greenlet(g3), parent(g2): g3 begin, num 3
greenlet(g3), parent(g2): i 0
greenlet(g3), parent(g2): i 1
greenlet(g3), parent(g2): i 2
greenlet(g2), parent(main): start 103 # g3循环3次转到g2运行
greenlet(main), parent(main): back main after g3.switch
greenlet(main), parent(main): back g1 from main # g1运行已经结束,因此g1.switch()直接返回传递的参数
greenlet(g3), parent(g2): g3 end back g3 from main
greenlet(g2), parent(main): start None # g3运行结束,转回到父协程g2,因此获取的值为None
greenlet(g2), parent(main): g2 end, start None
greenlet(main), parent(main): None # g2运行结束,因此获取的参数是None

从结果可知道,调用g.switch后返回的参数,是下次切换到本协程(其他协程调用本协程的switch或者throww)传递的参数,而与协程g没有关系。

协程与线程

假如在一个协程,切换到另一个线程中的协程会如何?

1
2
3
4
5
6
7
8
9
10
11
12
13
14
15
import threading
import greenlet
import time
def run():
print 'run in thread'
g = greenlet.greenlet(run=run)
th = threaing.Thread(target=g.switch)
th.start()
>>>
Traceback ...
...
error: cannot switch to a different thread

每个协程是依赖于栈空间的,而线程拥有独立的空间,当切换过去必然引起错误。greenlet也不允许这种切换

python中的享元模式(flyweight)

发表于 2015-04-13   |   分类于 python , design-pattern , 英文翻译   |  

这篇文章主要翻译自Design Pattern and Python Flyweight Pattern,稍微加上我自己的一点理解。

享元模式


《设计模式》中的享元是一种共享对象,能够在不同的上下文环境中同时使用,并且独立于上下文。因此,只有(隐式地)共享状态保存在享元对象本身中;而(显式地)上下文独立的状态被分别保存,在需要时传递给享元对象。本文中只讨论享元对象的创建机制以及对隐式共享状态的管理。享元模式常用在需要降低内存使用量的场景中。这种应用场景需要大量同一个对象的实例,并且这些实例拥有同样的隐式状态,而显式状态可以通过计算拿到或者存储代价比较低。

1. 严格的《设计模式》中的享元模式

严格的《设计模式》中的享元模式没有使用python中许多漂亮的特性。下面这个实现展示在一个静态地、强类型地语言中如何实现享元模式。

1
2
3
4
5
6
7
8
9
10
11
12
13
14
15
16
17
18
19
20
21
22
23
24
25
26
27
28
29
30
31
32
33
34
35
36
37
class Spam(object):
def __init__(self, a, b):
self.a, self.b = a, b
class SpamFactory(self):
def __init__(self):
self.__instances = {}
def get_instance(self, a, b):
key = (a, b)
if key not in self.__instances:
self.__instance[key] = Spam(a, b)
return self.__instance[key]
class Egg(self):
def __init__(self, x, y):
self.x, self.y = x, y
class EggFactory(object):
def __init__(self):
self.__instances = {}
def get_instance(self, x, y):
key = (x, y)
if key not in self.__instances:
self.__instances[key] = Egg(x, y)
return self.__instances[key]
#----------------------------
spam_factory = SpamFactory()
egg_factory = EggFactory()
assert spam_factory.get_instance(1, 2) is spam_factory.get_instance(1, 2)
assert egg_factory.get_instance('a', 'b') is egg_factory.get_instance('a', 'b')
assert spam_factory.get_instance(1, 2) is not egg_factory.get_instance(1, 2)

但是python是一种动态类型语言,类也能作为第一类对象。通过使用*args替代固定的初始化参数,并将享元类也传递给工厂类作为初始化参数,工厂类能够更加通用化。下面就是一个这样的例子。

2. 《设计模式》中的享元模式

这个例子稍微pythonic一点,使用了*args并且将类作为参数进行传递。因此不需要为每个工厂实现单独的类。简单来说实现了一个通用工厂,这个工厂需要传递进享元类本身,产生享元类对应的实例。

1
2
3
4
5
6
7
8
9
10
11
12
13
14
15
16
17
18
19
20
21
22
23
24
25
26
27
28
29
class FlyweightFactory(object):
def __init__(self, cls):
self._cls = cls
self.__instances = {}
def get_instance(self, *args, **kwargs):
key = (args, tuple(kwargs.items()))
return self.__instances.setdefault(key, self._cls(*args, **kwargs))
#--------------------------------------
class Spam(object):
def __init__(self, a, b):
self.a, self.b = a, b
class Egg(object):
def __init__(self, x, y):
self.x, self.y = x, y
class SubSpam(Spam):
pass
SpamFactory = FlyweightFactory(Spam)
EggFactory = FlyweightFactory(Egg)
SubSpamFactory = FlyweightFactory(SubSpam)
assert SpamFactory.get_instance(1, 2) is SpamFactory.get_instance(1, 2)
assert EggFactory.get_instance('a', 'b') is EggFactory.get_instance('a', 'b')
assert SubSpamFactory.get_instance(1, 2) is not SpamFactory.get_instance(1, 2)

通过python的语法,使工厂类更加通用化。需要注意SubSpamFactory与SpamFactory是两个不同的类工厂,产生的实例是不同的(即使传递相同的参数,SubSpamFactory产生的实例是SubSpam的实例,是Spam的子实例)。

3. 类装饰器版本

通过使用__call__魔术方法,可以不用显式地调用get_instance方法。直接通过SpamFactory(1,2)就能得到实例。
通过SpamFactory(1,2)得调用方式得到实例与通过Spam(1,2)得方式在形式上是一样的。例如,可以通过Spam=SpamFactory(Spam)的方式实现。相当于将SpamFactory又取了个Spam的名字,或者说将名字Spam重新绑定到SpamFactory类上。这实际上就是装饰器的功能。

1
2
3
4
5
6
7
8
9
10
11
12
13
14
15
16
17
18
19
20
21
22
23
24
25
26
27
28
class Flyweight(object):
def __init__(self, cls):
self._cls = cls
self.__instances = {}
def __call__(self, *args, **kwargs):
key = (args, tuple(kwargs.items()))
return self.__instances.setdefault(key, self._cls(*args, **kwargs))
@Flyweight
class Spam(object):
def __init__(self, a, b):
self.a, self.b = a, b
@Flyweight
class Egg(object):
def __init__(self, x, y):
self.x, self.y = x, y
assert Spam(1, 2) is Spam(1, 2)
assert Egg('a', 'b') is Egg('a', 'b')
@Flyweight
class SubSpam(Spam._cls): # 不能使用Spam
pass
assert SubSpam(1, 2) is SubSpam(1, 2)
assert SubSpam(1, 2) is not Spam(1, 2)

python的装饰器是高阶函数,以可调用对象为参数产生另外一个可调用对象。@Flyweight等同于上一个例子中的Spam = SpamFactory(Spam)。注意子类SumSpam的实现。

4. 函数装饰器版本

通过对类Flyweight实现__call__方法把该类伪装成了一个函数。直接使用函数实现装饰器更加方便。

1
2
3
4
5
6
7
8
9
10
11
12
13
def flyweight(cls):
instances = {}
return lambda *args, **kwargs: instances.setdefault(
(args, tuple(kwarges.items())),
cls(*args, **kwargs))
# 或者不使用lambda
def flyweight(cls):
instances = {}
def _wrap(*args, **kwargs):
key = (args, tuple(kwargs.items()))
return instances.setdefault(key, cls(*args, **kwargs))
return _wrap

5. 《设计模式》中的MixIn

目前为止,我们有一个代理方法(工厂函数),用来创建一个函数或者类。而这个函数或者类封装了享元类,缓存实例并且代理享元类进行实例化。工厂函数可以通过实现类方法的方式进行实例化的代理。

1
2
3
4
5
6
7
8
9
10
11
12
13
14
15
16
17
18
19
20
21
22
23
24
25
class FlyweightMixin(object):
_instances = {}
@classmeothd
def get_instance(cls, *args, **kwargs):
return cls._instance.setdefault(
(args, tuple(kwargs.items())),
cls(*args, **kwargs))
class Spam(FLyweightMixin):
def __init__(self, a, b):
self.a, self.b = a, b
class Egg(FLyweightMixin):
def __init__(self, x, y):
self.x, self.y = x, y
assert Spam.get_instance(1, 2) is Spam.get_instance(1, 2)
assert Egg.get_instance('a', 'b') is Egg.get_instance('a', 'b')
class SubSpam(Spam):
pass
assert SubSpam.get('x', 'y') is SubSpam.get_instance('x', 'y')
assert SubSpam.get('a', 'b') is not Spam.get_instance('a', 'b')

Mixin是一种接口类,类似Java的Interface一般是作为接口存在而自己不实例化为单独的实例。

6. Minxin版本

上一版本不太安全,没有办法阻止用户绕过Flyweight直接实例化享元类。(python的类实现是不完备的,很少有绝对的方法阻止用户去做一些事情。而且,python拥有完全的反射机制,用户几乎可以透过界面做任何事情。)
通过将get_instance方法移动到__new__方法中去,我们能(一定程度上)阻止用户直接实例化享元类。

1
2
3
4
5
6
7
8
9
10
11
12
13
14
15
16
17
18
19
20
21
22
23
24
25
26
27
28
29
30
31
32
33
34
35
36
# 所有实例都缓存在FlyweightMixin中
class FlyweightMixin(object):
_instances = {}
def __init__(self):
raise NotImplementedException
def __new__(cls, *args, **kwargs):
return cls._instances.setdefault(
# 需要cls作为键值的一部分
(cls, args, tuple(kwargs.items())),
# 通过super和type调用享元类进行实例化
super(type(cls), cls).__new__(cls, *args, **kwargs))
class Spam(FlyweightMixin):
def __init__(self, a, b):
self.a = a
self.b = b
class Egg(FlyweightMixin):
def __init__(self, x, y):
self.x = x
self.y = y
assert Spam(1, 2) is Spam(1, 2)
assert Egg('a', 'b') is Egg('a', 'b')
assert Spam(1, 2) is not Egg(1, 2)
# Subclassing a flyweight class
class SubSpam(Spam):
pass
assert SubSpam(1,2) is SubSpam(1,2)
assert Spam(1,2) is not SubSpam(1,2)

这个版本的改动比较大,需要理解python中的__new__魔术方法。另外,作为字典_instances的键值需要增加cls,因为这种方式将所有享元类的实例全部保存在了相同的字典中。而之前的每个享元类的实例是保存在独立的空间中的。

7. 改进的装饰器版本

除了继承,类属性可以动态的添加到享元类上。python是一种动态类型,类本身能够在运行时修改。这种方法更加灵活、限制更少、更加优雅,而且能够应用到第三方类上。(不过,更加难懂)

1
2
3
4
5
6
7
8
9
10
11
12
13
14
15
16
17
18
19
20
21
22
23
24
25
26
27
28
29
30
31
32
33
34
35
36
37
38
39
@classmethod
def get_instance(cls, *args, **kwargs):
return cls._instances.setdefault(
(cls, args, tuple(kwargs.items())),
super(type(cls), cls).__new__(*args, **kwargs)
def flyweight(decoree):
decoree._instances = {}
# 将get_instance 修改为 享元类进行实例化时调用的函数__new__
# python中 __new__是真正的构建函数,决定实例的模板和内存结构
# 而 __init__更像初始化函数,用来给实例变量赋予初值
decoree.__new__ = get_instance
return decoree
#---------------------------
@flyweight
class Spam(object):
def __init__(self, a, b):
self.a = a
self.b = b
@flyweight
class Egg(object):
def __init__(self, x, y):
self.x = x
self.y = y
assert Spam(1, 2) is Spam(1, 2)
assert Egg('a', 'b') is Egg('a', 'b')
assert Spam(1, 2) is not Egg(1, 2)
# Subclassing a flyweight class
class SubSpam(Spam):
pass
assert SubSpam(1,2) is SubSpam(1,2)
assert Spam(1,2) is not SubSpam(1,2)

8. 超类版本

上一个版本实际上起到了超类的作用,通过修改享元类的构建函数__new__决定创建新的实例,还是使用已经缓存的实例。直接通过超类的语法当然也能实现。(这种方式非常复杂,而且不易阅读和维护,不建议这样使用超类,甚至不建议使用超类语法本身)

1
2
3
4
5
6
7
8
9
10
11
12
13
14
15
16
17
18
19
20
21
22
23
24
25
26
27
28
29
30
31
32
33
34
35
36
37
38
class MetaFlyweight(type):
def __new__(cls, *args, **kwargs):
# 初始化类本身,类作为超类的实例进行初始化,可以忽略
type.__init__(cls, *args, **kwargs)
cls._instances = {}
# 修改类的构建函数
cls.__new__ = cls._get_instance
def _get_instance(cls, *args, **kwargs):
return cls._instances.setdefault(
(args, tuple(kwargs.items())),
# 调用 享元类 本身去实例化
super(cls, cls).__new__(*args, **kwargs))
class Spam(object):
__metaclass__ = MetaFlyweight
def __init__(self, a, b):
self.a = a
self.b = b
class Egg(object):
__metaclass__ = MetaFlyweight
def __init__(self, x, y):
self.x = x
self.y = y
assert Spam(1, 2) is Spam(1, 2)
assert Egg('a', 'b') is Egg('a', 'b')
assert Spam(1, 2) is not Egg(1, 2)
# Subclassing a flyweight class
class SubSpam(Spam):
pass
assert SubSpam(1,2) is SubSpam(1,2)
assert Spam(1,2) is not SubSpam(1,2)

9. 函数式超类

对于python,所有的方法、属性都可以动态的添加。可以通过函数式的方式进行操作。

1
2
3
4
5
6
7
8
9
10
11
12
13
14
15
16
17
18
19
20
21
22
23
24
25
26
27
28
29
30
31
32
33
34
35
36
37
38
39
40
@classmethod
def _get_instance(cls, *args, **kwargs):
return cls.__instances.setdefault(
(args, tuple(kwargs.items())),
super(type(cls), cls).__new__(*args, **kwargs))
def metaflyweight(name, parents, attrs):
# 通过实例化type,动态构建享元类本身
cls = type(name, parents, attrs)
# 设置类属性
cls.__instances = {}
# 修改享元类实例化时的逻辑
cls.__new__ = _get_instance
return cls
#----------------------------------------------------------
class Spam(object):
__metaclass__ = metaflyweight
def __init__(self, a, b):
self.a = a
self.b = b
class Egg(object):
__metaclass__ = metaflyweight
def __init__(self, x, y):
self.x = x
self.y = y
assert Spam(1, 2) is Spam(1, 2)
assert Egg('a', 'b') is Egg('a', 'b')
assert Spam(1, 2) is not Egg(1, 2)
# Subclassing a flyweight class
class SubSpam(Spam):
pass
assert SubSpam(1,2) is SubSpam(1,2)
assert Spam(1,2) is not SubSpam(1,2)

10. Pure函数超类版本

1
2
3
4
5
6
7
8
9
10
11
12
13
14
15
16
17
18
19
20
21
22
23
24
25
26
27
28
29
30
31
32
33
34
35
36
37
38
39
40
41
metaflyweight = lambda name, parents, attrs: type(
name,
parents,
# 直接通过__new__, __instances加入attrs
dict(attrs.items() + [
('__instances', {}),
('__new__', classmethod(
lambda cls, *args, **kwargs: cls.__instances.setdefault(
(args, tuple(kwargs.items())),
super(type(cls), cls).__new__(*args, **kwargs))
)
)
])
)
#----------------------------------------------------------
class Spam(object):
__metaclass__ = metaflyweight
def __init__(self, a, b):
self.a = a
self.b = b
class Egg(object):
__metaclass__ = metaflyweight
def __init__(self, x, y):
self.x = x
self.y = y
assert Spam(1, 2) is Spam(1, 2)
assert Egg('a', 'b') is Egg('a', 'b')
assert Spam(1, 2) is not Egg(1, 2)
# Subclassing a flyweight class
class SubSpam(Spam):
pass
assert SubSpam(1,2) is SubSpam(1,2)
assert Spam(1,2) is not SubSpam(1,2)


讨论


考虑到继承和反射。

如果需要继承或者反射,装饰器的方式是无效的(装饰器版本、函数式装饰器版本)。实际上,在这些版本中没有办法直接访问最原始定义的那个享元类。一些类属性(type, docstring, name, super classes等)不再能够访问。基于同样原因,我们不能使用装饰器作为一个超类(即不能通过@derector的方式实现超类的功能)。

如果需要使用反射,一些超类的属性能够复制给被装饰对象。例如,通过手动或者functools模块中的@wraps/@update_wrapper。但是不是所有的属性都能够复制给被装饰对象。

如果需要使用继承,对于装饰器版本来说,需要通过_cls访问真正的享元类本身。对于函数式装饰器版本来说就完全没有办法了。

如果需要扩展享元类(添加属性、继承等),改善的装饰器版本更加适合。Mixin的版本也是可以直接使用的,因为处理了子类继承的问题。当然,超类的版本也运行的非常好,因为超类原本就是可以继承的。

考虑到垃圾回收

如果要应用在生产环境,这些实例需要考虑垃圾回收。实际上,因为享元工厂中的字典缓存了实例,实例会一直被引用。这些实例在整个程序生命周期都不能通过自动垃圾回收而收回,导致大量的内存使用量以及一些错误的行为。

如果希望享元模式能够如期望般运行,可以使用python的weakref模块中的弱引用(weak reference)。弱引用不会阻止垃圾回收机制的运行,当实例不再有引用时可以被正常的回收。另外weakref中有个对象叫做WeakValueDictionary,行为与dict一致不过其值自然是弱引用的。

考虑到可用性

我们考虑两种截然不同的实现方式:

  1. 代理享元类:享元类被封装到对象内,通过代理实现想要的功能。例如《设计模式》的工厂版本、装饰器版本。
  2. 修改享元类:将想要的功能直接添加入享元类中。例如改善的装饰器版本,超类版本,Mixin版本。

从最终使用的角度考虑,所有的实现方式都是等价且透明的,只需要在超类、装饰器、mixin中3选1即可。

从元数据和继承的角度考虑,修改的方式比代理的方式更加合适。修改的方式也没有额外的开销,而代理的方式需要为每一个享元类额外创建一个(代理享元类的)对象。

然而,代理的方式比较普遍适用,而修改的方式只能适用于类。(不过鉴于python中一切皆对象的概念,修改的方式对函数也是可以的)

最后,代理和装饰器比超类和继承更加具有柔性,后者很难应用于已经实现了的类中。改进的装饰器版本看起来更加有意思(估计那个super(type(cls), cls)就够让人奇怪的了)。

Unix中的几种I/O模型

发表于 2015-02-06   |   分类于 linux   |  

image

对简单操作模型的理解


堵塞与非堵塞

  • 堵塞(blocking):

    调用者(caller)必须等待操作完成才能返回。操作完成可能是异常、失败、返回空数据、返回不完整数据等。

  • 非堵塞(non-blocking):

    被调用者(call)立即返回,不会因为数据未到而等待。一般是指内核等待数据到达。

无论是堵塞或者非堵塞,都可能返回空的数据,都需要数据从内核缓存区到用户缓存区的拷贝时间。堵塞操作可能因为信号、异常而失败,也可能因为对方关闭连接返回空的数据。非堵塞操作会直接返回空的数据或者已经存在的(部分)数据,不会等待要求的数据全部到达内核后才返回。

同步与异步

  • 同步模型(synchronous)

    同步模型是指操作顺序执行,前续操作和后续操作顺序执行,后续操作发生时前序逻辑已经完成。

  • 异步模型(asynchronous)

    异步模型是指操作顺序非顺序执行,后续操作执行时前序操作还未完成,前序操作可能在后台处理,可能挂起。

同步与异步的主要区别是,在后续操作开始时前续操作是否真正完成,或者说在后续操作和前续操作之间是否能够执行其他的操作。

对简单模型的类比


生活中我们会在医院取药,利用该场景做一个类比。药单是操作的对象,类比fd;药是数据,类比data;取药是操作,类比recv;取药系统、药剂师(护士)等类比操作系统。

堵塞模型

你拿着药单去药剂室取药5盒,把药单交给药剂师发起取药的操作,药剂师并不立刻回应你。你在窗口一直等(堵塞),药剂师拿到药单发现手头没有对应的药,于是自己或者让护士去库房取,等在库房取回后交给你,此次取药堵塞操作完成。但是你发现药剂师只给了你三盒,于是你又重复取药2盒的操作,这个时候药剂师拿到药单发现手头就有2盒,于是立马给你,此次堵塞操作也完成。或者药剂师拿到药单之后,突然出现意外你被赶跑了,此次堵塞取药操也完成,虽然你没有拿到药,但是被告知出意外了,你自己看着办吧。

非堵塞模型

你又来取药,把药单交给药剂师发起取药操作,药剂师拿到药单发现手头没有对应的药,立马(非堵塞)告诉你没有药了,此次非堵塞取药操作完成。或者,药剂师手头正好有3盒立即给了你,此次非堵塞操作也完成。

可见,堵塞和非堵塞的重要区别是药剂师手头没有药时,他会让护士去取等回来再给你,还是立马告诉你没有。

同步模型

你再次来取药,无论是那种方式,你必须在取到药之间不能做其他任何的操作,即使你被堵塞在窗口等待药剂师去库房取药的时候。

异步模型

你最后一次取药,在把药单给药剂师之后和药拿到手之间,你可以干点别的事情,玩玩手机、听听音乐或者去其他窗口取别的药。

可见,同步与异步的区别在于你发起取药的操作和药到手之间,能不能干其他的事情。

同步堵塞

你在取药的过程中执行堵塞操作,直到药到手为止。

同步非堵塞

同步非堵塞几乎没什么用,你把药单给药剂师,但是药剂师手头没有药立马告诉你,你需要再次发起取药操作直到拿到药。这个就是轮询模式,还不如同步堵塞,因为浪费了药剂师(系统)不断回应你的时间。

异步堵塞

现实中几乎没用的模型,因为你总是等待取药,在这期间不能干别的,因为只有1个你。但是在计算机的世界中你会分身术(线程),你的分身可以去做别的事情。

异步非堵塞

异步非阻塞模型通常是(框架给)用户使用的模型,你去取药,把药单交给药剂师,然后不等待结果自己就走了,待药从库房拿到后药剂师再想法设法给你。

异步的几种接口


药剂师的想方设法就是不同的表现形式,异步接口:

  • 事件通知

    医院很先进,你把药单给药剂师后,自己去干别的,等广播你的名字后,你再去取药。这个是事件通知。

  • 回调

    医院护士很多,你把药单给药剂师并且把自己喝多少药之类的也一并交代。等药取到后,药剂师派个小护士直接把药给你灌下去。这个是回调,需要先定义后续操作逻辑(喝药),再注册(在取药的时候告诉药剂师)。

  • 占位符

    你把药单给药剂师,药剂师给你的是药盒子,你以为拿到了真实的药,然后去进行打热水、打开盒子、拿药的一些列操作,等你真正喝药的时候,药会被药剂师偷偷摸摸的放入盒子里,这需要特殊的药盒子。

  • 状态

    类似事件通知,但不是直接通知你,而是有个大屏幕。当药剂师从库房拿到药时会在大屏幕打出你的名字,于是你再次跑到窗口拿到药。

    如果你同时需要取药、打针两件事请,你分别在医药窗口和注射窗口提交了单据。当轮到你的时候,大屏幕只出现你的名字,你不得已只好挨个问哪个窗口准备好了(select)。

    但是另外一个医院很先进,不仅打出你的名字还打出窗口号,于是你直接去已经准备好的窗口即可(epoll)。

Unix下的几种IO模型


说完简单的类比回到Unix平台。在Unix(linux)平台下有五种I/O模型:

  • 堵塞I/O模型(blocking I/O)
  • 非堵塞I/O模型(un-blocking I/O)
  • I/O多路复用模型(select, poll, epoll)
  • 信号驱动I/O模型(SIGIO)
  • 异步I/O模型(posix aio_functions)

I/O操作一般分为两个阶段:

  1. 等待数据达到内核缓存区
  2. 将数据从内核拷贝到用户进程

我们用recvfrom定义操作,并且将数据分为在内核缓冲区和用户进程缓冲区。

堵塞I/O模型

image

堵塞I/O模型中,先在内核中等待数据到来,再等待数据从内核拷贝到用户进程,两个阶段都被堵塞。下图是简单的一问一答堵塞型的服务器。

image

非堵塞I/O模型

image

非堵塞I/O模型中操作recvfrom立即返回,为了得到完整数据需要不断的发起操作,这个就是轮询。recvfrom实际上有两个作用,第一询问数据是否到来,第二得到数据。

I/O多路复用

I/O多路复用是同步还是异步比较模糊。像上面那样轮询一个fd效率比较底下,多路复用一次可以询问多个fd的数据是否到来。于是,将recvfrom的两个作用拆分成2个函数ask和read,ask堵塞(非堵塞没有意义)的一次询问多个fd,任何一个fd的数据到达就返回,然后再发起非堵塞read操作。如果ask的返回不能确定哪个fd的数据准备好了,就是select模型;如果同时返回确定的已准备好数据的fd,就是epoll模型。

站在处理所有fd的角度,多路复用I/O依然是同步堵塞模型;但是站在每个fd的角度(每个IO操作的角度),处理单个fd的整个I/O操作时也处理了其他fd的I/O操作,因此是异步;而且每个fd都需要等待数据从内核拷贝到用户缓冲区,因此也是堵塞操作。所以一般认为I/O多路复用是异步堵塞模型。(通过把这种模型新起个个名字可以看出确实比较难以用堵塞/非堵塞、同步/异步来定义)

image

异步I/O

该异步I/O完全符合异步的要求,在调用时立即返回并且在数据到达后通过信号来通知进程。Unix类系统最常见的异步是回调,通过注册回调由内核在事件发生时调用,例如信号。在这里等于是把事件(数据到达)通过信号的方式通知用户让用户去处理了。需要注意异步I/O没有堵塞,发起操作后立即返回,当信号到来时数据已经被拷贝到用户缓冲区中了。

image

完整的I/O模型定义


  • A synchronous I/O operation causes the requesting process to be blocked until that I/O operation completes;
  • An asynchronous I/O operation does not cause the requesting process to be blocked;

  • 异步同步通过在一完整的I/O操作时是不是有其他I/O操作来判断。无论是等待数据到达内核,还是等待数据从内核缓冲区拷贝到用户缓冲区都是堵塞模型。

几种不同I/O模型的异同


image

简单总结:

  1. 异步非堵塞I/O模型,内核帮用户完成了整个数据的传送。
  2. 堵塞I/O模型,用户需要至少等待一个阶段的I/O传送。
  3. 异步模型,用户在完成一次I/O操作期间,可以进行其他的I/O操作。

(完)

tornado中一些通用的函数和类

发表于 2015-01-19   |   分类于 python , tornado   |  


本篇记录tornado源代码阅读过程中一些有意思的函数和类等,偏向于python编程技巧语法等。

ObjectDict


1
2
3
4
5
6
7
8
9
10
11
12
13
14
15
16
17
class ObjectDict(dict):
"""Makes a dictionary behave like an object, with attribute-style access.
"""
def __getattr__(self, name):
try:
return self[name]
except KeyError:
raise AttributeError(name)
def __setattr__(self, name, value):
self[name] = value
od = ObjectDict()
od.a = 1
od['a'] # 1
od.a # 1

import_object


1
2
3
4
5
6
7
8
9
10
11
12
13
14
15
16
17
18
19
20
21
22
23
24
25
26
27
def import_object(name):
"""Imports an object by name.
import_object('x') is equivalent to 'import x'.
import_object('x.y.z') is equivalent to 'from x.y import z'.
>>> import tornado.escape
>>> import_object('tornado.escape') is tornado.escape
True
>>> import_object('tornado.escape.utf8') is tornado.escape.utf8
True
>>> import_object('tornado') is tornado
True
>>> import_object('tornado.missing_module')
Traceback (most recent call last):
...
ImportError: No module named missing_module
"""
if name.count('.') == 0:
return __import__(name, None, None)
parts = name.split('.')
obj = __import__('.'.join(parts[:-1]), None, None, [parts[-1]], 0)
try:
return getattr(obj, parts[-1])
except AttributeError:
raise ImportError("No module named %s" % parts[-1])

比importlib.import_module更加方便,import_object可以直接导入模块或者属性,而前者只能导入模块。另外注意两个函数都是将导入的对象返回,而不是将其暴露在当前域名中, 和import有差距。

1
2
3
4
5
6
7
8
9
import_object('os')
os #NameError
path_exists = import_object('os.path.exists')
# from os.path import exists as path_exists
####################
mypath = importlib.import_module('.path', 'os')
# from os import path as mypath

###

tornado源码分析-1

发表于 2015-01-18   |   分类于 python , tornado   |  

image

一个简单的tornado应用实例


1
2
3
4
5
6
7
8
9
10
11
12
13
14
import tornado.ioloop
import tornado.web
class MainHandler(tornado.web.RequestHandler):
def get(self):
self.write("Hello, world")
application = tornado.web.Application([
(r"/", MainHandler),
])
if __name__ == "__main__":
application.listen(8888)
tornado.ioloop.IOLoop.instance().start()

tornado框架以Application为入口,以RequestHandler为接口,以IOLoop为核心进行构建。上面的例子创建了一个简单的Hello,World程序。tornado以异步高性能为目的,采用异步非堵塞网络IO模型,低层利用epoll(linux平台),特别适合高性能长连接的应用场景。

异步非堵塞编程模型


异步函数],会在结束所有操作前就返回,其中的一些操作(特别是耗时间的IO操作)会交给后台去运行,这些操作完成后再触发应用中的其它函数逻辑。一般有4种类型的异步接口:

  • 回调参数。
    通过参数传入callback等待完成后再进行最后的callback操作。
    asynchronous_fetch->http_client.fetch->handle_respones->callback,
1
2
3
4
5
6
7
from tornado.httpclient import AsyncHTTPClient
def asynchronous_fetch(url, callback):
http_client = AsyncHTTPClient()
def handle_response(response):
callback(response.body)
http_client.fetch(url, callback=handle_response)
  • 返回一个占位实例。
    通过两个Future实例完成一步步的回调,事件通知或者订阅者-发布者模型。
1
2
3
4
5
6
7
8
9
from tornado.concurrent import Future
def async_fetch_future(url):
http_client = AsyncHTTPClient()
my_future = Future()
fetch_future = http_client.fetch(url)
fetch_future.add_done_callback(
lambda f: my_future.set_result(f.result()))
return my_future
  • 提交给队列。
    nose.js是这种模型,每个操作是一个事件提交给后台的其他线程库,完成后再交给主线程中的队列进行回调操作。

  • 回调注册。
    POSIX信号是这种模型,通过注册回调函数。(这里我还不太清楚与回调参数有什么不同)

无论是哪种形式,异步模型都有一些通用逻辑,可以分为堵塞前操作,堵塞操作,通知,堵塞后操作。

  • 堵塞前操作,立即完成的,发生在堵塞操作前的逻辑。
  • 堵塞操作,堵塞操作,主要需要解决的部分。
  • 通知,堵塞操作完成后,如何通知已经完成了堵塞操作
  • 堵塞后操作,堵塞操作完成后的逻辑,一般处理堵塞操作的返回值。

同步堵塞模型比较简单,所有逻辑操作都捆绑在一起,没有也不必进行通知。异步非堵塞模型需要重点处理堵塞操作和通知。一般的异步非堵塞使用callback模型,将堵塞前操作和堵塞后逻辑显式分开,通过向堵塞操作传递堵塞后操作进行通知机制(callback)。

tornado中的异步非堵塞模型


tornado的异步接口利用Python的协程语法yield可以暂停操作,将堵塞逻辑、通知和堵塞后操作捆绑到一起,不用显式的拆分最大限度的保持和同步接口的一致性。通过yield让出堵塞操作交给IOLoop统一处理,再通过Future机制进行通知机制。

1
2
3
4
5
6
7
from tornado import gen
@gen.coroutine
def fetch_coroutine(url):
http_client = AsyncHTTPClient() # 堵塞前操作
response = yield http_client.fetch(url) # 堵塞操作
return response.body # 堵塞后操作

tornado的异步堵塞模型低层采用epoll模型,通过(隐式)Future机制进行回调通知,通过IOLoop处理堵塞操作。简单的IOLoop逻辑示例:

1
2
3
4
5
6
7
8
9
10
11
12
13
14
# Simplified inner loop of tornado.gen.Runner
def run(self):
# send(x) makes the current yield return x.
# It returns when the next yield is reached
future = self.gen.send(self.next)
# 通过send 通知 协程进行 堵塞后操作
# future衔接 堵塞前和堵塞后的逻辑
def callback(f):
self.next = f.result()
self.run()
future.add_done_callback(callback)
# 向future中注册辅助函数,进行回调后的通知

tornado中核心类


tornado主要有两个核心类,IOLoop封装低层epoll集中处理堵塞操作。iostream封装read、write函数进行缓存和更方便的处理HTTP协议。具体分析稍后进行。

Python中的单例模式

发表于 2015-01-17   |   分类于 python   |  

(梳理下python中的设计模式。这里面的设计模式不仅仅是传统意义中的设计模式,还有python中的一些惯用法。)

单例模式 Singleton


单例模式的用途与全局变量一样,提供全局共享的唯一数据。单例模式封装数据和操作方法,需要保证方法返回的值一致(不变),并且单利模式类的初始化函数一般不能有参数。使用场景长见于处理和保存配置文件、只会实例化一次的实例等等。

1. 一般的单例模式,利用锁保证一致性。

1
2
3
4
5
6
7
8
9
10
11
12
13
14
15
16
17
import threading
class Singleton(object):
_singleton_lock = threading.Lock()
@classmethod
def instance(cls):
if not hasattr(cls, '_instance'):
with cls._singleton_lock:
if not hasattr(cls, '_instance'):
cls._instance = cls()
return cls._instance
def test(self):
print('ok')
assert Singleton.instance() is Singleton.instance() #True

2. python的单利模式,利用__new__返回唯一的实例。

1
2
3
4
5
6
7
8
9
10
11
12
13
14
15
16
17
18
import threading
class PySingleton(object):
_singleton_lock = threading.Lock()
def __new__(cls, *args, **kwargs):
if not hasattr(cls, '_instance'):
with cls._singleton_lock:
if not hasattr(cls, '_instance'):
cls._instance = super(PySingleton, cls).__new__(cls, *args, **kwargs)
return cls._instance
def __init__(self, *args, **kwargs):
print 'init runs once'
ps1 = PySingleton() #init runs once
ps2 = PySingleton() #init runs once
assert ps1 is ps2 #True

Python的__new__特殊方法会多次调用初始化函数__init__,导致这个唯一的实例反复初始化。

3. 模块单例

1
2
3
4
5
6
7
8
9
10
11
12
13
14
15
16
17
18
19
20
21
#singleton.py # 文件
class _Singleton(object):
@classmethod
def instance(cls):
if not hasattr(cls, '_instance'):
cls._instance = cls()
return cls._instance
Singleton = _Singleton()
del _Singleton
#other.py
from singleton import Singleton
Singleton.instance().start() # 或者直接使用Singleton实例

import有锁机制,不需要再使用锁进行并行保护;classmethod类方法可以通过方法和实例调用。

评论-白色锤子(smartisan T1)

发表于 2015-01-09   |   分类于 notes , life   |  

白色锤子


圣诞节前得到一份礼物白色锤子手机T1。一直关注老罗,现在借此机会写点关于锤子的东西。

锤子优点


漂亮

白锤非常整洁漂亮,两面的玻璃触摸上去很光滑。

用心

所有app可以看出确实用心在做,一些常用app经过一致的设计,给人与众不同感觉,让人眼前一亮。

流畅

比之前的一部Android手机流畅太多,鉴于之前手机的内存其实没什么可比性。但是,用起来比IPhone5还要流畅让我非常惊讶。

简洁

依赖于老罗的审美观,锤子手机的UI还是比较简洁。无论是从一开就有话题的九宫格设计,还是每个操控界面都很简洁大方,没有一般国产手机的粗糙感。

锤子缺点


误操作

误操作率很大,特别是应用中的右下角和左下角都会有明显的误触几率。减小这两块触屏的灵敏度是有效的解决办法

完全对称设计

完全对称设计没有必要,左右侧按键非常不必要。1. 大屏都是两手操作,传统的布局对左右手谁更有利真不知道。2. 很多无法对称的东西,关机键、声孔、摄像头、距离传感器等。

顶部的关机键

关机键放在顶端对于大屏手机不明智,如果非要放在顶端,左边也要比右边好很多,更多的右利手单手几乎按不到,不如放在左端让左手按起来方便。

两侧的按键

这种对称很不必要。1. 导致手机横放放不平,大屏手机横放看视频很常见;2. 快速偷拍功能,会导致非常多的误按,一个礼拜大概会有10张以上。

底部实体按键

选择底部实体按键不是个好主意。1. 实体键需要比较大的压力,单手操作用大拇指按比较困难,容易导致手机滑落;2. 白锤三个实体键有不平感,中间只有一个亮灯真的不好看。

软件

太过追求与众不同而忘记初衷。软件要给人好用美观,而不是装文艺青年,没有达到看山是山的境界。

###

强烈推荐,容易上手,时不时的小惊喜,同时需要容忍T1的不成熟。

python中的多线程和GIL锁

发表于 2014-12-26   |   分类于 python源码剖析   |  

写在前面


最近工作中又遇到了GIL和多线程的问题,借此机会重新梳理一下。大致脉络仿照陈儒的《Python源码剖析》第15章Python多线程机制,但会将平台转移到Linux下的Pthread线程库上。主要介绍CPython解释器的C实现,具体的Python库(thread,threading)的介绍可以参考Python Threading Module。同时会介绍下相关函数在Linux平台中的表现等。

python中的GIL锁


CPython中有一个全局的解释器锁叫做GIL(global interpreter lock),对解释器中的共享变量提供保护。GIL不是必须的,可以通过对每个资源单独加锁的方式去掉GIL,也就是将GIL换成更细粒度的锁。实际上也有这么做的,不过结果是在单核上的性能不如有GIL的版本(2倍的差距),大量的细粒度锁的开销消耗了大量的资源。所以,Guido有篇很著名的文章It isn’t easy to remove GIL讨论这个问题。如果去掉GIL需要考虑两件事:

1
2
1. 不会降低Python在单核上的性能;
2. 需要考虑如何将现在大量的库进行迁移;

总之从Python3的尴尬处境可以简单知道,CPython中的GIL是不可能去除的。

做技术很多时候是在折中(tradeoff),就比如当年Linux用宏内核架构会被认为过时一样。性能高、简单(实现简单)好用(使用快速)几乎立于不败之地,更多参考见这本书The Unix Hackers Handbook。

GIL锁的类型以及语义


代码中的interpreter_lock就是全局解释器锁,类型为PyThread_type_lock,简单的void指针,然后再根据不同的平台转换成对应类型的指针,在Linux中的类型是pthread_lock指针。

1
2
3
4
5
6
7
8
9
10
11
12
13
14
15
16
17
18
19
20
21
22
23
24
25
26
27
28
29
30
//python2.7.5/Python/ceval.c
static PyThread_type_lock interpreter_lock = 0; /* This is the GIL */
static PyThread_type_lock pending_lock = 0; /* for pending calls */
static long main_thread = 0;
int
PyEval_ThreadsInitialized(void)
{
return interpreter_lock != 0;
}
void
PyEval_InitThreads(void)
{
if (interpreter_lock)
return;
interpreter_lock = PyThread_allocate_lock();
PyThread_acquire_lock(interpreter_lock, 1);
main_thread = PyThread_get_thread_ident();
}
//python2.7.5/Python/Thread_pthread.h
typedef struct {
/* 0=unlocked, 1=locked */
char locked;
/* a <cond, mutex> pair to handle an acquire of a locked lock */
pthread_cond_t lock_released;
pthread_mutex_t mut;
} pthread_lock;

之所以需要pthread_lock而不是直接使用原生的pthread_mutex_t,是因为Pthread的标准有未定义的(undefined)部分,主要是:

1
2
3
4
1. 一个已经获取锁的线程再次获取同一个锁时的表现;
(同一个线程多次调用pthread_mutex_lock,在linux中默认类型的锁第二次调用总会堵塞)
2.一个已经锁住的锁,被其他线程释放时的表现;
(其他线程调用pthread_mutex_unlock,在linux中默认类型的锁总会被释放)

因此,Python实现了pthread_lock规避标准中的未定义部分。pthread_lock分为3个成员:

1
2
3
1. char locked:是否锁住的标志,每次加锁需要竞争此标志,如果为1就是已经锁住,加锁的线程返回失败非0或者等待;
2. pthread_cond_t lock_released:锁的等待队列,请求锁时带有waitflag的线程会等待在该条件变量上;
3. pthread_mutex_t mut:锁本身;

从上面的结构可以看到一个共识,加锁与代码之间的关系是为了使不同进程/线程串行执行代码,串行执行的结果就是共享资源操作结果的一致性。保证并行执行的正确性有几种不同的方法:

1
2
3
1. 使程序串行执行临界区:加锁、信号、条件
2. 资源本身保证原子性:原子操作、无锁队列
3. 去掉共享资源:函数式编程

pthread_lock有1组4个函数(接口)调用,分别是:

1
2
3
4
5
6
1. PyThread_allocate_lock: 分配一个锁;
2. PyThread_free_lock: free一个锁;
3. PyThread_acquire_lock(lock, waitflag):获取锁,waitflat=1时没有获取锁则等待;
(waitflag=0,实现了pthread_mutex_trylock的语义;waitflag=1实现了pthread_mutex_lock的语义)
4. PyThread_release_lock: 总是成功释放锁,并且唤醒至少1个在等待锁的线程;
(PyThread_release_lock实现中即使pthread_mutex_lock失败也会把locked恢复为0)

Python中只使用了默认类型的锁,pthread_mutex_init中的第二个参数为NULL,mut本身是一个多次请求会等待的锁,不过Python本身不使用等待的语义。Phtread_lock和一组操作函数创造了一个这样的线程锁:通过waitflag指定获取锁时是否等待,成功获取返回0,失败返回非0;释放锁总能成功并唤醒至少1个等待锁的线程。

最后补充一下PyThread_allocate_lock中会调用PyThread_init_thread,进而调用PyThread__init_thread进行线程初始化。这是因为有些平台上进程和线程是完全分离的概念,需要调用相应的函数启动多线程库。在Linux的Pthread平台下是一进程多线程的模型,默认情况下一个进程也是一个线程,因此在这种情况下PyThread__init_thread是空的函数,完全不需要启动线程库的动作。

python中的线程


Python中通过thread等Python库启动的线程就是一个普通的Pthread线程,与C程序中调用pthread_create启动的线程没有本质区别,只不过Python中同一时间只有一个线程在运行,具体哪个线程能运行通过竞争GIL决定的。Python中线程的本质:

1
2
1. 同一时间只有一个Python线程(确切的说是虚拟机)运行,只能使用1个CPU核心;
2. 不同线程的调度(哪个线程竞争到了GIL)完全由Python所在的操作系统决定;

python启动


python中的线程启动通过thread.start_new/start_new_thread函数,然后调到CPython中的thread_PyThread_start_new_thread。这个函数主要处理用户调用时传入的参数,然后将启动函数和参数包装入bootstate结构,然后以t_bootstrap启动原生线程(linux下的pthread线程)。需要bootstate的主要原因有两点:

1
2
3
1. python不能直接以用户设置的函数启动线程,需要做一些处理;
2. 原生的pthread线程pthread_create函数只能接受一个参数;
(在linux c编程中创建线程需要传入多个参数也需要将过个参数封装到单个结构中)
1
2
3
4
5
6
7
8
9
static PyMethodDef thread_methods[] = {
{"start_new_thread", (PyCFunction)thread_PyThread_start_new_thread,
METH_VARARGS,
start_new_doc},
{"start_new", (PyCFunction)thread_PyThread_start_new_thread,
METH_VARARGS,
start_new_doc},
...
}

从调用thread模块一直到PyThread_start_new_thread的线程都是主线程在运行;调用pthread_create然后进入t_bootstrap的线程是子线程。先看下主线程的调用路径,主路径通过pthread_create创建了子线程然后返回。注意这个时候主线程是拿者GIL锁的。

1
2
3
4
5
6
7
8
9
10
11
12
13
14
//python2.7.6/python/Threadmodule.c
thread_PyThread_start_new_thread
_PyThreadState_Preallock
new_threadstate
(设置threadstate,注意这个时候thread_id是主线程的id)
PyEval_InitThreads
(分配和获取GIL锁)
PyThread_start_new_thread
pthread_create
pthread_detach
PyInt_FromLong (返回)

这里面需要注意一点,主线程创建子线程后就detach了,所以Python中的子线程都是分离的。然后看下子线程的调用路径,需要说明从pthread_create创建子线程开始运行到t_bootstrap中的PyEval_AcquireThread的这段代码是没有运行在Python的虚拟机中的,也就是说这段代码和GIL没有关系,在这期间主线程和子线程(在多核机器中)是可以同时运行的(不排除争夺其它的锁而导致挂起)。

1
2
3
4
5
6
7
8
9
10
11
12
13
14
15
16
17
18
19
20
21
22
23
24
25
26
27
28
29
30
31
32
33
//python2.7.6/python/threadmodule.c
t_bootstrap
PyThread_get_thread_ident
(这个时候将ident设置为真正的子线程的ident)
_PyThreadState_Init
_PyGILState_NoteThreadState
PyThread_set_key_value
find_key
(这段代码是将threadstate设置为每个线程的私有变量。主要做debug用。
线程私有变量是这样一种变量,每个线程中的变量名是一样的,但是具体的值和线程相关,而且相互之间透明。
在linux Pthread中由库直接提供支持。
Python在其他平台中自己也实现了一个,可以看成一个ident:value的字典,但是每个线程只能取到自己ident上的值)
PyEval_AcquireThread
PyThread_acquire_lock
(等待获取GIL)
PyThread_State_Swap
(设置当前的全局变量 _PyThreadState_Current。每个Python线程在退出前必须调用这个函数换出自己,运行前调用换入自己)
PyEval_CallObjectWithKeywords
PyObject_call
func->ob_type->tp_call
PyThreadState_Clear
PyThreadState_DeleteCurrent
PyThread_delete_key_value
PyEval_ReleaseLock
(释放GIL锁)
PyThread_exit_thread
exit(0)

上面是子线程的调用路径。到这里还有两个问题没有解决,第一个是子线程如何进入虚拟机运行的(进入PyEval_EvalFrame);第二个是主线程何时释放GIL以便子线程在t_bootstrap中获取到而运行。

第一个问题

先说第一个问题,在子线程调用路径中最后会调用tp_call,假设用户的子线程函数是函数,类似下面这样:

1
2
3
4
5
def myfunc(x):
do_something_with(x)
tpid = thread.start_new_thread(myfunc, (1,))

那么tp_call对应的是Python实现的function_call函数,如下所示:

1
2
3
4
5
6
7
8
9
//python2.7.6/python/funcobject.c
PyTypeObject PyFunction_Type = {
PyVarObject_HEAD_INIT(&PyType_Type, 0)
"function",
...
function_call, /* tp_call */
...
}

function_call也在同一个文件中定义,它的调用路径见下。从中可以看到,每个线程对应一个Frame对象,也就是一个Python虚拟机,而不是一个Python虚拟机对应多个Python线程。(不像CPU那样,每个CPU对应多个线程,每个线程通过保存上下文设置寄存器进行切换)。

1
2
3
4
5
6
7
function_call
PyEval_EvalCodeEx
(获取func字节码中存储的全局、局部变量、参数、闭包等等)
PyFrame_new
(创建新的Frame对象,Python虚拟机)
PyEval_EvalFrame
(运行创建的虚拟机)

第二个问题

第二个问题,主线程何时释放GIL锁。Python代码在虚拟机Frame中运行,其中有个变量_Py_Ticker。当_Py_Ticker小于0时,Python会释放GIL锁进行一次Python线程的调度。

1
2
3
4
5
6
7
8
9
10
11
12
13
14
15
16
17
18
19
20
21
22
23
24
25
26
27
28
29
30
31
32
33
34
35
if (--_Py_Ticker < 0) {
if (*next_instr == SETUP_FINALLY) {
/* Make the last opcode before
a try: finally: block uninterruptible. */
goto fast_next_opcode;
}
_Py_Ticker = _Py_CheckInterval;
tstate->tick_counter++;
#ifdef WITH_TSC
ticked = 1;
#endif
if (pendingcalls_to_do) {
if (Py_MakePendingCalls() < 0) {
why = WHY_EXCEPTION;
goto on_error;
}
if (pendingcalls_to_do)
/* MakePendingCalls() didn't succeed.
Force early re-execution of this
"periodic" code, possibly after
a thread switch */
_Py_Ticker = 0;
}
if (interpreter_lock) {
/* Give another thread a chance */
//这里是一次GIL锁的释放和获取,子线程有机会获取GIL得以运行
if (PyThreadState_Swap(NULL) != tstate)
Py_FatalError("ceval: tstate mix-up");
PyThread_release_lock(interpreter_lock);
/* Other threads may run now */
PyThread_acquire_lock(interpreter_lock, 1);
if (PyThreadState_Swap(tstate) != NULL)
Py_FatalError("ceval: orphan tstate");

需要说明几点:

1
2
3
4
5
6
1. GIL锁的粒度是每个Python指令,在一个Python指令中的操作是原子操作;
2. PyEval_EvalFrame中有一些指令运行后会跳到fast_next_opcode,跳过了GIL调度的代码区,所以这些指令和紧接下来的一个指令都是原子操作;
(例如 x = 1,依赖这种细微的具体实现编程是不可取的,只要记住一个Python指令是原子操作足已);
3. 每次Pyhon线程调度的指令数不一定整好是_Py_CheckInterval(100)个,有些指令会跳过释放GIL的代码区;
4. Python线程最后由谁竞争到了GIL完全由操作系统决定,也就是具体哪个线程执行由操作系统决定,Python只管释放/获取一次GIL锁;
5. 在线程创建和销毁的代码区有一部分不运行在Frame中,这时Python中多个线程可能同时运行;

补充

上面提到Pthread线程和Python线程,按照CPython实现来看,Pthread线程和Python是一一对应的。称为Python线程侧重于正在运行Python代码时的线程(PyEval_EvalFrame部分);称为Pthread线程侧重于CPython中线程的创建/销毁时的线程,等同起来看也没有任何问题。

我对Ruby的一些观点

发表于 2014-12-08   |   分类于 language , ruby   |  

个人好恶


我给编程语言贴上个人好恶的标签以便更快的掌握它。这个道理比较简单,既然我不喜欢ruby,那么我就要弄清楚我不喜欢它的哪里,这些哪里就是语言的语法、模型、惯例等等。

简单的来说,我不喜欢Ruby:)

哪里


Ruby的哲学

<松本行弘的程序世界>中说发明Ruby是“因为它给我带来了快乐”,“用Ruby开发很快乐”,”让程序设计更快乐而开发的程序语言”,快乐是Ruby最根本的哲学。在我看来,Ruby的快乐是一种发散式的。同一个问题提供多种解决方法(提供多种的语法元素),大量的挪用其他语言方便编程的元素等方式都是发散式的。让程序员充满好奇,同时提供了大量的武器(每个类中大量的方法)可以使每个人用自己喜欢的方式去编程。但这些都是有代价的,提高了涉入的门槛以及作为大型项目语言的困难程度,自由而不统一,RoR的默认遵从最佳实践的原则实际是为了补偿Ruby的自由。

多种语言的混合体

解决问题不止一个方法(there is not only one way to do),Ruby为了这个目的混合了大量不同语言的语法。Ruby的这种混合体不是吸收各种语言的优秀元素从而自成一体的混合,而是将不同语言的好用的元素拼凑成一个整体的混合。初步涉入,Ruby会给我一种四不像的怪异感,AWK的BEGING/END语法,bash的HereDocument,不同语言的输出函数echo/print/puts,C++的new实例方法,lisp的block等等。将其他语言的好用的语法元素直接搬过来套在自己的头上,很难达到一种调和一致的感觉。

为了支持完全面向对象的大量方法

Ruby中有个String类型,类似Python的str、C++的std::string等。不包括编码,字符、unpack指令等,String类有78个方法。如果再加上编码字符unpack等,差不多会多达150。为了完全支持面向对象,将操作塞入类型中使其成为方法,而不是像C那样实现为功能函数,也不太像Java那样实现为类的静态方法,而是每个实例都携带了大量的方法(即使一些方法完全是为了作为面向对象的语法糖)。

多种方法的初始化

为了满足不同程序员的快乐,Ruby提供了不同的初始化方法。Ruby中的列表是一个可变异构容器,支持C++的new,Python的[],lisp式的列表等初始化方式。

1
2
3
4
5
6
7
8
9
10
11
12
13
names = Array.new
names = Array.new(20)
names = Array.new(4, 'default_value')
# 上面3个可以看成同一个方法new的多态
names = Array.new(10){ |e| e = e *2 } # 第一次看到这个,我怎么也搞不清楚初始值在哪里
names = Array.[](1, 2, 3, 4, 5) # 是不是像c的 int names[] = {1, 2, 3, 4, 5}
names = Array[1, 2, 3, 4, 5] # 使用方括号
# 上面3中初始化方法,分别使用大括号、括号、方括号, 混合体的极端体现
digits = Array(1..9)

函数调用的多种形式

Ruby支持不带参数的调用,以及带有参数的调用的多种形式。不带参数的方法可以直接调用,没有括号或者其他的语法要求。当带有参数时,可以有带括号或者不带括号两种形式。所以,Ruby的内置Hash类型就有了很多方式初始化。

1
2
3
4
5
6
7
8
9
10
months = Hash.new
months = Hash.new()
# 可以带有或者不带括号
months = Hash.new("month") # 带有默认值的初始化
months = Hash.new "month" # 不带括号的参数调用
months = Hash["a" => 200, "b" => 300]
months = Hash "a"=>200, "b"=>300 # RoR风格
months = {"1" => "jan", "2" => "Feb" } # Python {'1':'jan', '2':'Feb}

一致性

Ruby混合了多种语言的语法特色,一致性很差。例如多种的初始化方法、带参函数调用的多种形式。Ruby的哲学做事情有多种方法导致一致性非常不好,这一点是我非常不喜欢的。我心目中的编程语言类似<黑客与画家>中<一百年后的编程语言>中所说的,语言应该提供一个非常精简一致的内核,Ruby与此完全是背道而驰。再举个变量的定义和引用的例子,全局变量和引用需要$符号,局部变量完全不需要,实例的属性定义和赋值时需要@,类的属性需要@@。好吧,某种方式看也比较一致,不同类别的属性需要不同的前置符号。

1
2
3
$global
puts $global

再举个等于比较的例子。Ruby中有4种比较运算符

1
2
3
4
1. == 数值比较
2. === case语句中的比较
3. .eql? 类型和数值比较
4. .equal? id比较, 类似Pyhon的 is 关键字

判断循环语句

Ruby的语法不太愿意提供统一的规则,而是为现实中的各种逻辑情况都提供语法支持。例如Ruby中的各种条件和循环,retry,next,redo,这些语法支持差不多实现了各种变体的goto。在<松本行弘的程序世界>中谈到如何对待多重继承的问题时,松本行宏采用了Mixin的折中方式,既提供多重继承的支持但是又部分限制多重继承带来的问题。这里也同样,采用多种语法实现类似的goto语法支持,但是又限制了goto的随意性。

从这里也可以理解到Ruby语言的设计哲学,最大程度的提供自由并对一些明显带来问题的部分采取限制。采用的方法是不直接支持这些语法(例如goto,多重继承),而是创造多个语法元素提供类似的语法支持同时规避掉原有问题。

unless

unless这种东西真的有好处吗?unless可以看成是if not的变体,每次看到这个我都在脑海中人肉转换成 if not,特别是用在单独语句中。

1
2
3
v = 1
puts 1 unless 1 > 2
puts 1 if not 1 > 2

yield与block

语句块在其他语言里面也存在,但是没有Ruby中的块这么强的功能。比如在C++中以大括号括起来的是语句块,可以定义局部变量、类的构建和析构,但是不能像Ruby中这样作为参数传递。Ruby中的块类似于Lisp中的lambda语句,可以作为参数传递、可以调用等等。或者说像Javascript中的first-function可以在使用的位置直接定义。结合yield,块可以发挥很大的作用,例如协程等

####

django-源码分析-表单系统-1

发表于 2014-11-20   |   分类于 python , django   |  

目前的环境


1
2
3
4
5
6
7
8
9
10
11
12
13
14
15
16
17
18
19
20
21
#django-admin.py startproject django_study
#cd django_study && python manager.py startapp study && cd -
#tree django_study
django_study
|-- django_study
| |-- __init__.py
| |-- __init__.pyc
| |-- settings.py
| |-- settings.pyc
| |-- urls.py
| `-- wsgi.py
|-- manage.py
`-- study
|-- forms.py
|-- forms.pyc
|-- __init__.py
|-- __init__.pyc
|-- models.py
|-- models.pyc
|-- tests.py
`-- views.py

一个简单的表单示例


1
2
3
4
from django import forms
class MyTestForm(forms.Form):
my_test_field = forms.CharField(max_length=20, min_length=0)

通过使用manager.py shell命令本地测试这个form类(IPython环境)。MyTestForm继承forms.Form,声明式的定义每个field的具体类型和属性等。

1
2
3
4
5
6
7
# python manager.py shell
In [1]: from study import forms as s_forms
In [2]: s_form = s_forms.MyTestForm(data={'my_test_field':'my_test_field_data'})
In [3]: s_form.as_p()
Out[3]: u'<p><label for="id_my_test_field">My test field:</label> <input id="id_my_test_field" maxlength="20" name="my_test_field" type="text" value="my_test_field_data" /></p>'

按照python的语法,my_test_field只是MyTestForm的类属性而不是实例属性,那么不同的实例如何区分。实际上MyTestForm只是一个声明,django通过元编程(超类)会生成真正的用于实例化的类,不妨称为真实类。具体情况结合源码分析。

1
2
3
4
5
6
7
8
9
10
11
12
13
14
15
16
17
18
19
20
21
22
23
24
25
26
27
28
29
30
31
32
33
34
35
36
37
38
39
40
41
42
43
44
45
46
47
48
49
50
51
52
53
54
55
56
57
58
59
60
61
62
63
64
65
66
67
68
69
70
71
72
73
74
75
76
77
78
79
80
81
82
83
84
85
86
87
88
89
90
91
92
93
94
95
96
97
98
99
100
101
102
103
104
105
106
107
108
109
110
111
112
113
114
115
116
117
118
119
120
121
122
# <1>
# django/forms/forms.py
# 为了使用python的元编程,Form就是一个简单的继承类,作为`MyTestForm`等自定义类的语法支持,所有的自定义类必须继承于Form
# Form的基类就是six.with_metaclass的返回值,实际上是一个临时的中介类,它的具体作用稍后分析
class Form(six.with_metaclass(DeclarativeFieldsMetaclass, BaseForm)):
"A collection of Fields, plus their associated data."
# This is a separate class from BaseForm in order to abstract the way
# self.fields is specified. This class (Form) is the one that does the
# fancy metaclass stuff purely for the semantic sugar -- it allows one
# to define a form using declarative syntax.
# BaseForm itself has no way of designating self.fields.
# <2>
# django/utils/six.py
# 临时的中介类由此函数生成,即 type.__new__(cls, name, (), d)
# 这个临时的中介类作为Form的基类,以便于在生成真实类时调用meta这个超类
# 到这里就有了两层的中介:第一层forms.Form作为用户自定义类的基类(类似于接口的作用)
# 第二层,临时的中介类作为forms.Form的基类,以便于调用形成最后真实类的超类meta
# MyTestClass -> Form -> 临时中介类 -> 超类meta -> 真实类
def with_metaclass(meta, *bases):
"""Create a base class with a metaclass."""
# This requires a bit of explanation: the basic idea is to make a
# dummy metaclass for one level of class instantiation that replaces
# itself with the actual metaclass. Because of internal type checks
# we also need to make sure that we downgrade the custom metaclass
# for one level to something closer to type (that's why __call__ and
# __init__ comes back from type etc.).
class metaclass(meta):
__call__ = type.__call__
__init__ = type.__init__
def __new__(cls, name, this_bases, d):
if this_bases is None:
return type.__new__(cls, name, (), d)
return meta(name, bases, d)
return metaclass('temporary_class', None, {})
# 上面的__new__方法会调用2次:第一次在six.with_metaclass被调用时调用,返回一个临时的中介类作为forms.Form的继承基类;
# 第二次在定义(程序运行编译时)`MyTestForm`时调用,返回meta(name, bases, d)生成最后的真实类,
# 这个类就是`MyTestForm`实例化时真正其作用的类
# 所以,表面看上`MyTestForm`是自定义类,实例由该类实例化;
# 单由于超类的存在,`MyTestForm`这个名字实际上指向的是由DeclarativeFieldsMetaclass动态生成的类
#(meta(name, bases, d)),它的基类是BaseForm
# <3>
# django/forms/forms.py
# DeclarativeFieldsMetaclass是生成最后真实类的超类, meta(name, bases, attrs)中的meta
# 将定义的各个Field实例,收集到真实类的base_fields中
# 这个超类的以小写class结尾,与其它超累的大写Class不一致:)
class DeclarativeFieldsMetaclass(MediaDefiningClass):
"""
Metaclass that collects Fields declared on the base classes.
"""
# 这个attrs包含了MyTestClass等用户自定义类中的类属性,例如my_test_field等
# 还包含了BaseForm的各个属性和方法
def __new__(mcs, name, bases, attrs):
# Collect fields from current class.
current_fields = []
for key, value in list(attrs.items()):
if isinstance(value, Field):
current_fields.append((key, value))
attrs.pop(key)
current_fields.sort(key=lambda x: x[1].creation_counter)
attrs['declared_fields'] = OrderedDict(current_fields)
new_class = (super(DeclarativeFieldsMetaclass, mcs)
.__new__(mcs, name, bases, attrs))
# Walk through the MRO.
declared_fields = OrderedDict()
for base in reversed(new_class.__mro__):
# Collect fields from base class.
if hasattr(base, 'declared_fields'):
declared_fields.update(base.declared_fields)
# Field shadowing.
for attr, value in base.__dict__.items():
if value is None and attr in declared_fields:
declared_fields.pop(attr)
new_class.base_fields = declared_fields
new_class.declared_fields = declared_fields
return new_class
# <4>
# django/forms/forms.py
# BaseForm是`MyTestForm`等用户自定义类的基类
# 会作为 meta(name, bases, attrs)中的bases
@python_2_unicode_compatible
class BaseForm(object):
# This is the main implementation of all the Form logic. Note that this
# class is different than Form. See the comments by the Form class for more
# information. Any improvements to the form API should be made to *this*
# class, not to the Form class.
def __init__(self, data=None, files=None, auto_id='id_%s', prefix=None,
initial=None, error_class=ErrorList, label_suffix=None,
empty_permitted=False):
# 如果实例化时传入了数据,则认为该Form是绑定的。
# 例如用户提交表单在view中有form = MyTestForm(**request.cleaned_data)
self.is_bound = data is not None or files is not None
self.data = data or {}
self.files = files or {}
self.auto_id = auto_id
self.prefix = prefix
self.initial = initial or {}
self.error_class = error_class
# Translators: This is the default suffix added to form field labels
self.label_suffix = label_suffix if label_suffix is not None else _(':')
self.empty_permitted = empty_permitted
self._errors = None # Stores the errors after clean() has been called.
self._changed_data = None
# The base_fields class attribute is the *class-wide* definition of
# fields. Because a particular *instance* of the class might want to
# alter self.fields, we create self.fields here by copying base_fields.
# Instances should always modify self.fields; they should not modify
# self.base_fields.
# 将属于类的base_fields复制到属于实例的fields中,防止后续操作污染类属性base_fields
# base_fields是由
self.fields = copy.deepcopy(self.base_fields)

可以看到,由于超类的使用用户可以通过声明式的方式定义自己的表单类。但也会使得类不在以默认的方式实现,从而源码可读性变差。

with_metaclass的演变


关于six.with_metaclass有一些演变导致现在的可读性更差,现在试图分析下原因,源码如下。

1
2
3
4
5
6
7
8
9
10
11
12
13
14
15
16
17
18
19
20
21
22
23
24
25
# 1.7.1版本django中的six.with_metaclass
def with_metaclass(meta, *bases):
"""Create a base class with a metaclass."""
# This requires a bit of explanation: the basic idea is to make a
# dummy metaclass for one level of class instantiation that replaces
# itself with the actual metaclass. Because of internal type checks
# we also need to make sure that we downgrade the custom metaclass
# for one level to something closer to type (that's why __call__ and
# __init__ comes back from type etc.).
class metaclass(meta):
__call__ = type.__call__
__init__ = type.__init__
def __new__(cls, name, this_bases, d):
if this_bases is None:
return type.__new__(cls, name, (), d)
return meta(name, bases, d)
return metaclass('temporary_class', None, {})
# 1.5.11版本的six.with_metaclass
def with_metaclass(meta, *bases):
"""Create a base class with a metaclass."""
return meta("NewBase", bases, {})
# 这个meta中的__new__会调用两次:第一次是调用with_metaclass生成中介类,作为Form的基类;
# 第二次实现`MyTestForm`等用户自定义类生成真实类

旧版本中with_metaclass直接返回一个由超类动态生成的中介类作为forms.Form的基类,继承关系比较简单MyTestForm->Form-> 中介类 -> meta->真实类。而现在的形式更加复杂,在于生成中介类和真实类使用了不同的方法,中介类使用type.__new__(cls, name, (), d),真实类使用meta(name, bases, d),这样做的主要好处是使最后真实类的类型和继承关系更加清楚。

1
2
3
4
5
6
7
8
9
10
11
12
13
14
15
16
17
18
19
20
21
22
23
24
25
26
27
# 1.7.1
In[13]: from django import forms
In[15]: type(forms.Form)
Out[15]: django.forms.forms.DeclarativeFieldsMetaclass
In[16]: forms.Form.mro()
Out[16]: [django.forms.forms.Form, # 不存在tempary_class的中介类
django.forms.forms.BaseForm,
object]
# 1.5.1
In [1]: from django import forms
In [2]: type(forms.Form)
Out[2]: django.forms.forms.DeclarativeFieldsMetaclass
In [3]: forms.Form.mro
Out[3]: <function mro>
In [4]: forms.Form.mro()
Out[4]:
[django.forms.forms.Form,
django.forms.forms.NewBase, # 1.7.1中的继承中少了这个中介类NewBase(tempary_class)
django.forms.forms.BaseForm,
object]

form表单


回过头看一下MyClassForm.as_p()中的各部分如何运作。

1
2
3
4
5
6
7
8
9
10
11
12
13
14
15
16
17
18
19
20
21
22
23
24
25
26
27
28
29
30
31
32
33
34
35
my_test_form.as_p -> self._html_output -> self.no_field_errors -> self.errors -> self.full_clean
-> self._clean_fields()
# 负责按照field的名字(例如:"my_test_field")获取数据,然后调用my_test_field.clean,
# 各Field.clean主要处理各类型Field本身数据检查工作,例如 max_length,min_length检查等,
# 然后调用my_test_form.clean_my_test_field执行用户在form类中自定义的处理函数,例如
class MyTestForm(forms.Form):
my_test_field = forms.CharField(max ...)
def clean_my_test_field(self):
value = self.cleaned_data['my_test_field']
return value.strip()
# 如果有错误,则将名字和异常存入self.add_error(field, error)
-> self._clean_form -> self.clean
# self.clean提供给用户的hook接口,自定义类中可以重载, 例如:
class MyTestForm(forms.Form):
my_test_field = forms.CharField(max...)
def clean(self):
value = self.cleaned_data.get('my_test_field', None)
if value:
self.cleaned_data['my_test_field'] = value.strip()
return self.cleaned_data
-> self._post_clean
# 另一个hook
# 回到self.no_field_erros
-> 然后迭代每个field,处理两类error,top_error属于表单或者隐藏field的; error属于每个field
-> 如果form定义了error_css_class或required_css_class就提取出来
-> 一次处理field的label,help_text,到这里会发现一些属于field但是需要在field外表现的属性都会被提取出来
-> 输出html格式文本

field类


每类field是一种表单域,每个field处理lable、单选框、复选框、错误提示、验证等。如示例中所示,field通过声明为form类的属性而定义。form会将所有的field实例收集到base_fields属性中并在实例化时赋值给实例的fields,再通过改写__getitem__方法实现field = form[fieldname]获取BoundField实例。在form.as_p中涉及到了一些field的操作,现在跟踪下。

1
2
3
4
5
6
7
8
# form._clean_fields中遍历field获取对应的值。
-> field.widget.value_from_datadict
# 获取对应的field.widget的值,一般情况下返回的就是data.get(fieldname)
-> field.clean -> self.to_python -> self.validate -> self.run_validators -> value
# 所有的data都是字符串格式,to_python会根据field的类型返回合适的python数据类型,例如int、list、None、''等
# self.validate会验证to_ptyhon返回的值,例如验证数字是否是NaN、Inf、-Inf,required的CharField是否为空等
# self.run_validators循环调用每个validator验证,validator根据每个field的参数而来,例如max_length,min_length等

简单的继承关系图

1
2
3
4
5
6
7
8
9
10
11
12
13
14
15
16
17
18
19
20
21
22
23
24
Field -> CharField -> RegexField
-> EmailField
-> FielField -> ImageField
-> URLField
-> IPAddressField
-> GenericIPAddressField
-> SlugField
-> IntegerField -> FloatField
-> DecimalField
-> BaseTemporalField -> DateField
-> TimeField
-> DateTimeField
-> BooleanField -> NULLBolleanField
-> ChoiceField -> TypeChoiceField
-> MultipleChoiceField -> TypedMultipleChoiceField
-> FilePathField
-> ComboField
-> MultiValueField -> SplitDateTimeField
-> FielPathField

BoundField


BoundField是一个存有数据的Field,主要是提供接口(类似代理模式)以及html格式输出。默认情况,BoundField输出对应类型Field的html。

1
2
3
4
5
6
7
8
9
10
11
12
13
14
15
16
17
18
19
20
21
22
23
24
25
26
27
28
29
30
31
32
33
# django.forms.BoundField
def __str__(self):
"""Renders this field as an HTML widget."""
if self.field.show_hidden_initial:
return self.as_widget() + self.as_hidden(only_initial=True)
return self.as_widget()
def as_widget(self, widget=None, attrs=None, only_initial=False):
"""
Renders the field by rendering the passed widget, adding any HTML
attributes passed as attrs. If no widget is specified, then the
field's default widget will be used.
"""
if not widget:
widget = self.field.widget
if self.field.localize:
widget.is_localized = True
attrs = attrs or {}
auto_id = self.auto_id
if auto_id and 'id' not in attrs and 'id' not in widget.attrs:
if not only_initial:
attrs['id'] = auto_id
else:
attrs['id'] = self.html_initial_id
if not only_initial:
name = self.html_name
else:
name = self.html_initial_name
# 通过field.render函数获取field的html
return force_text(widget.render(name, self.value(), attrs=attrs))

django选择通过实现一个BoundFiled代理类统一处理field的输出,而不是在基类中实现接口将实现分散在各Field类型中。

widget


widget是表单中的小部件处理表单域的输入以及验证。Widget类似Form是由超类实现,超类的作用是为Widget实现media属性,具体的作用稍后分析。不同widget对应input标签中的type属性。

1
2
3
4
5
6
7
8
9
10
11
12
# Input.render
# render会被BoundField调用,输出input标签的html语句
def render(self, name, value, attrs=None):
if value is None:
value = ''
# self.input_type由每个继承input的重载,实现input标签中的type="textarea"属性
final_attrs = self.build_attrs(attrs, type=self.input_type, name=name)
if value != '':
# Only add the 'value' attribute if a value is non-empty.
final_attrs['value'] = force_text(self._format_value(value))
# flatatt会将attrs转换为key=value形式,例如 class="css_class" name="for_id"
return format_html('<input{0} />', flatatt(final_attrs))

widget的继承关系

1
2
3
4
5
6
7
8
9
10
11
12
13
14
15
16
17
18
Widget -> Input -> TextInput -> DateTimeBaseInput -> DateInput
-> DateTimeInput
-> TimeInput
-> NumberInput
-> EmailInput
-> URLInput
-> PasswordInput
-> HiddenInput -> HiddenInput
-> FileInput -> ClearableFileInput
-> Textarea
-> CheckboxInput
-> Select -> NullBooleanSelect
-> SelectMultiple
-> MultiWidget -> SplitDateTimeWidget -> SplitHiddenDateTimeWidget
SubWidget -> ChoiceInput -> RadioChoiceInput -> RadioInput ->
-> CheckboxChoiceInput

django模板系统-源码分析-2

发表于 2014-11-18   |   分类于 python   |  
## django中的tag和filter ------------------- 《django模板系统-源码分析1》中提到每个BLOCK块对应的解析函数filter以及node交由用户定制,parser只负责调用。这就给了用户自定义tag的机会,用户可以像使用插件一样在模板中使用自定义的tag,甚至用户可以扩展模板语言成为一个较为完整的独立语言(需要完成函数的实现、变量值的再绑定等)。 ## django模板中的Library --------------------------- 首先看一下用户怎样实现自定义的tag和filter以及如何进行注册。这里注册的含义是指能够被Parser加载到局部变量`tags`和`filter`中。Parser在初始化方法中会将全局变量builtins中的Library实例中保存的tags和filter更新到局部变量中,而全局变量builtins在模块被加载的时候将默认的filters和tags加载进来。 undefined ## Library --------------- 为了方便自定义filter和tag,django定义了一些辅助函数和库类Library,用户按照一定的规则进行tag和filter的注册。 ### 注册filter Library类的filter方法可以作为装饰器以多种形式对自定义的filter函数进行注册。Library类的filter方法和filter\_function方法会互相调用,注意分场景分析。 自定义的filter函数分为两种,一种是简单的函数;另一种本身是装饰器。Library.filter\_function的作用就是获取自定义filter的名字,对于前一种直接获取函数的名字;对于后一种则尽量获取其内部被装饰函数\_decorated\_function的名字。如果用户自定义的filter本身是个装饰器,最好把装饰器的内部变量\_decorated\_function设置为被装饰的函数,例如。 undefined 调用Library.filter进行自定义filter函数的注册有多种形式。 1.第一种,直接调用形式。 undefined 2.第二种,不带参数的函数式调用形式 undefined 3.第三种,指定自定义filter的名字 undefined 4.第四种,指定其他参数 undefined 无论何种调用方式,都会进入Libaray.fiter的最后一个分支进行三部分的处理。第一部分注册filter函数`self.filters[name]=filter_func`;第二部分将传入的参数设置为filter\_func以及内部装饰函数的属性,这个filter\_func不一定是用户自定义的filter函数,在多数情况下是装饰了自定义filter的装饰器;第三部分设置名称`filter_func._filter_name=name`。 ### 注册tag 自定义tag时,用户需要实现两个部分。一个用户自定义的继承了Node的类实现此tag的语义;另一个用户定义的解析函数,将对应tag的BLOCK类型token解析为语法树并返回对应的Node,即实现此tag的语法解析。我们以{% firstof %}为例说明,firstof会返回给定参数中第一个为真的变量`{% firstof 0 1 2 3 %} => 1`。 undefined ## defaultfilters ------------------------ 选取几个比较常用的filter函数进行分析。 ### lower undefined lower函数将字符串转换为小写,stringfilter是装饰器以统一处理字符的安全问题。需要注意带双引号的变量代表字符,不然代表一个变量。`{{ "ABC"|lower }} => abc`;`{{ ABC|lower }} => ''`,后一个因为ABC代表变量且不存在而返回空字符串。 ### yesno undefined ## defaulttags ---------------------- defaultfilters的逻辑比较简单,可以通过源码获知。而defaulttags则比较复杂,不仅因为包含两部分(语义分析和语法分析),还因为tags的种类较多,所有的逻辑功能都通过tags提供,例如判断、with、循环等。下面简单分析几种tag的实现。 ### with with 可以在模板中自定义变量,或者是给变量取别名。 undefined 首先看with的语法部分,do_with函数(django.template.defaulttags.do_with)。 undefined 然后继续看with的语义部分WithNode。 undefined 可以看到,with的实现非常清楚。do_with实现语法解析,WithNode实现语义求值,Context实例保存上下文的环境变量。 ### for for 可以在模板中进行循环求值。通过with的分析,可以简单将for理解为,设置同一(几)个环境变量的值(Context)、对子作用域求值(nodelist)、直到耗尽所有的环境变量的值、最后对所有值拼接。 undefined do\_for将for分解为了4个部分,每个部分在实现语义的时候分别处理。 undefined ## 总结 ------------ 至此简单分析了django的template框架以及自定义filter和tag的实现。依托于django模板框架的良好架构,用户自定义的filter和tag十分方便简洁。

编写高质量代码-改善python程序的91个建议勘误

发表于 2014-11-08   |   分类于 books   |  

我对《编写高质量代码》的看法


  1. 整本书的示例代码风格比较差,一点也不是作者看重的pythonic。空格、大小写、命名规则、单字母名称等随处可见;
  2. 示例代码短缺、逻辑错误比较多。例如打印素数的代码明显错误,还有几处印刷导致代码缺行的;
  3. 大多数主题一带而过,比较适合开阔视野,具体应用需要额外的工作;

勘误


1. 第一章:建议1:(2)代码风格

“不应当过分地使用奇技淫巧”, 但c[::-1]并不等于list(reversed(c)。

1
2
3
4
5
6
7
8
9
10
11
12
13
14
15
a = [1, 2, 3, 4]
c = 'abcdef'
print a[::-1]
print c[::-1]
print list(reversed(a))
print list(reversed(c))
==>
c[::-1]
>>> 'fedcba'
list(reversed(c))
>>> ['f', 'e', 'd', 'c', 'b', 'a']

2. 第一章:建议1:(3)标准库

当用%做格式化式,如果只有一个格式化参数,一般是直接格式化而不用单元素的元组。

1
2
3
4
print 'Hello %s!' % ('Tom', )
==>
print 'Hello %s!' % 'Tom'

3. 第一章:建议1:(3)标准库

format并不比%格式化更pythonic。format不能用于字符串中有{}原型的情况。另外根据pep8的风格说明,位置参数和值之间没有空格。

1
2
3
4
print '{greet} from {language}.'.format(greet = 'Hello World', language = 'Python')
==>
print '{greet} from {language}.'.format(greet='Hello,world', language='Python')

一般来说,由于format中没有提供格式化字符,需要调用参数的特殊方法,会比%慢。

1
2
3
4
5
%timeit '{greet} from {language}.'.format(greet = 'Hello World', language = 'Python')
1000000 loops, best of 3: 780 ns per loop
%timeit '%s from %s.' % ('Hello World', 'Python')
1000000 loops, best of 3: 202 ns per loop

4. 第一章:建议2:(1)要避免劣化代码:2)避免使用容易引起混淆的名称

a. 两个示例代码都不pythonic;
b. 变量名一般用C语言式的varibale_name,而不是驼峰式的camelCase;
c. 短作用域的临时变量用短小的名称反而比较好看;
d. 实例代码有问题,当没有找到num时应该返回False;
e. 代码风格问题,操作符两边应该有空,参数之间逗号之前没有空格之后有空格。

1
2
3
4
5
6
7
8
9
10
11
12
13
14
15
16
17
18
19
# 实例一
def funA(list, num):
for element in list:
if num==element:
return True
else: # pass这边根本没用, 没找到应该返回Fase
pass
# 实例二
def find_num(searchList, num):
for listValue in searchList:
if num==listValue:
return True
else:
pass
==>
def has_find(alist, num):
return num in alist

5. 第一章:建议4:4)

关于注释,编写可阅读的代码,推荐《编写可读代码的艺术》。
几个示例中的代码和注释都很糟糕。代码变量本身没有足够的意义,注释本身就是代码的重复。

6. 第一章:建议5:通过适当添加空行使代码布局更为优雅、合理

实例一的猜数代码写的并不好。

1
2
3
4
5
6
7
8
9
10
11
12
13
14
15
16
17
18
19
20
21
22
23
24
25
import random
guesses_made = 0 # 变量初始化与使用的地方太远,移动到while之前比较好
name = raw_input('Hello! What is your name?\n')
number = random.randint(1, 20)
print 'Well, {0}, I am thinking of a number between 1 and 20.'.format(name)
while guesses_made < 6:
guess = int(raw_input('Take a guess: ')) # 没有处理异常,输入字符等情况
guesses_made += 1
if guess < number: # 分支是互斥的,用 if .. elif .. else 比较好
print 'Your guess is too low.'
if guess > number:
print 'Your guess is too high.'
if guess == number:
Break # 没有Break,是 break
if guess == number:
print 'Good job, ..'
else:
print 'Nope. ..'

7. 第二章:建议8:利用assert语句来发现问题

其中的assert语句的表达式是错误的。

1
2
3
4
assert expression [", " expression2]
==>
assert expression [, expression2]

__debug__是不能在程序中赋值,在python2.7中报SynaxError。如果python启动时指定-O或-OO优化选项则__debug__为False,此时断言会被优化掉。

使用断言要区分错误和异常。异常需要用代码处理,如文件打开失败、网络连接失败、磁盘空间不足等这些属于异常情况(CornerCase); 错误是不应该发生的情况,预示程序存在bug。所以断言一般用于检查正常程序中不会出现,但是为了预防万一出现用于提示有bug的场合。

1
2
3
4
5
# 示例
while True:
print 'empty loop'
assert False, 'it can not happen.' # 不可能发生,但是万一到这就是bug。

8. 第二章:建议10:充分利用Lazy evaluation的特性:1)避免不必要..

这种in判断不太建议使用列表或者元组,而是使用set。在python中,set检查是O(1)而列表和元组是O(n)。

1
2
3
4
5
6
7
8
9
10
abbreviations = ['cf.', 'e.g.', 'ex.', 'etc.', 'fig', 'i.e.', 'Mr.', 'vs.']
for w in ('Mr.', 'Hat', 'is', 'chasing', 'the', 'black', 'cat', '.'):
if w in abbreviations:
pass
==>
abbreviations = set(['cf.', 'e.g.', 'ex.', 'etc.', 'fig', 'i.e.', 'Mr.', 'vs.'])
for w in ('Mr.', 'Hat', 'is', 'chasing', 'the', 'black', 'cat', '.'):
if w in abbreviations:
pass

9. 第二章:建议12:不推荐使用type来进行类型检查

实例一的代码中type(n) is types.IntType。这个n的类型肯定不是types.IntType,而是UserInt(作者认为n的类型应该是int,“显然这种判断不合理这句”)。作者应该想说的是isinstance,但isinstance(n, int)返回的也是True …

1
2
3
4
5
6
7
8
9
10
11
12
class UserInt(int):
pass
ui = UserInt(2)
type(ui)
>>> __main__.UserInt
isinstance(ui, UserInt)
>>> True
isinstance(ui, int)
>>> True

实例二中的isinstance("a", (str, unicode))这个可不pythonic。在python2中检查是否是字符串用basestring,python3中直接用str。

1
2
3
4
if PY3:
isinstance("a", str)
else:
isinstance("a", basestring)

10. 第三章:建议19:(2)循环嵌套导入的问题

实例代码中c1和c2的循环嵌套与使用from .. import ..还是使用import没有关系。python的编译执行是按照代码块而不是逐行。当编译执行代码块中的代码引用其他模块,而其他模块又引用了当前代码块或者还未编译的代码块时就会导致循环引用。而且循环引用除去报ImportError,还可能报AttributeError。

1
2
3
4
5
6
7
8
9
10
11
12
13
14
15
16
17
# 当前代码块 -> 引用其他模块 -> 其他模块引用 当前代码块 或者还未编译代码 -> 循环引用 -> Error
# c1.py
from c2 import g
def x():
pass
# c2.py
from c1 import x
def g():
pass
python c1.py
>>> ImportError: cannot import name g
# c1.py -> from c2 import g -> c2.py -> from c1 import x -> x代码块还未编译 -> 引发ImportError

11. 第三章:建议13:使用else子句简化循环

a. 使用else是否能够pythonic不太清楚。else有时能够简化逻辑,但却与直觉相反会使代码不易读懂。(也许是与我自己的直觉相反,我总以为else是条件异常也就是break才执行;但在这里是额外的、附加的的意思,循环正常时执行);
b. 示例代码中的print_prime函数逻辑错误,打印给定n内的素数不包含1以及n本身。

1
2
3
4
5
6
7
8
9
10
11
12
13
14
15
16
17
18
19
20
21
22
23
24
25
26
27
28
29
30
31
32
33
34
35
36
def print_prime(n):
for i in range(2, n):
found = True
for j in range(2, i):
if i % j == 0:
found = False
break
if found:
print i,
print_prime(1)
>>>
print_prime(2)
>>>
print_prime(5)
>>>2, 3
==>
def is_prime(n):
for i in range(2, n):
if n % i == 0:
return False
return True
def print_prime(n):
for i in range(1, n+1):
if is_prime(i):
print i,
print_prime(1)
>>> 1
print_prime(2)
>>> 1, 2
print_prime(5)
>>> 1, 2, 3, 5

12. 第三章:建议24:遵循异常处理的几点基本原则

图3-1中的图中少了一些执行流。try异常没有被捕获而finally没有异常时,异常会被抛出。

1
2
3
4
5
6
7
try:
raise IOError('test')
finally:
print 'finally'
>>> finally
>>> IOError: 'test'

13. 第三章:建议26:深入理解None

因为None、0、[],()的布尔值都为False,所以在0表示数字而非空的含义时,应该用is None来区分。

1
2
3
4
5
6
7
8
def print_your_salary(n):
if n is None: # 显然None与0的含义是不一样的
raise ValueError('can not be None')
if not n:
print 'Aha, you have No salary?'
else:
print 'rich man', n

14. 第三章:建议30:[],()和{}:一致的容器初始化形式

“本节开头的例子改用列表解析,直接可将代码行数减少为2行,这在大型复杂应用程序中尤为重要,…”。列表解析比较简洁清晰,但是不要过度使用(像下面这样其实很难直接看懂)。简单的追求代码短小是没有价值的,简洁清晰明确的表达算法才最重要。

1
2
3
4
5
6
7
8
9
10
11
# 这个列表解析式并不被推荐,前后的if以及else让人很难第一时间看清意图
[v**v if v%2 == 0 else v+1 for v in [2, 3, 4, -1] if v>0]
==>
alist = []
for v in [2, 3, 4, -1]:
if v > 0:
if v % 2:
alist.append(v*v)
else:
alist.append(v+1)

字典解析式的语法是{key_exp: value_exp for iter if cond},中间需要冒号。

15. 第三章:建议32:警惕默认参数潜在的问题

最后一个示例代码,当然不能传入time.time(),但是也不能传入time.time这个函数本身。

1
2
3
4
5
6
def report(when=time.time):
pass
==>
def report(when=None):
when = when or time.time()

16. 第四章:建议36:掌握字符串的基本用法

“空白符由string.whitespace常量定义”这句话表述不太正确。应该是“空白符的定义与string.whitespace默认值一样”更加贴切。简单来说改变string.whitespace的值并不会改变字符串strip等操作的行为。

1
2
3
4
5
6
7
import string
string.whitesapce = ','
s = ' abcde '
s.strip()
s
>>> 'abcde' # 行为并没有改变

17. 第四章:建议37:按需选择sort()或者sorted()

a. sort是列表对象自带的方法(不是函数);sorted是内建的函数。
b. sort会改变列表对象本身;sorted返回一个排好序的新对象。

17. 第五章:建议50:利用模块实现单例模式

a. 不知道为什么要用scala和falcon这种小众语言讲解他们的singleton实现;
b. 利用模块做单例,见下。

1
2
3
4
5
6
7
8
9
10
11
# single.py
class _Singleton(object):
def __init__(self, *args, **kwargs):
do_something()
Singleton = _Singleton()
# other.py
import single
single.Simgleton # 这样保证了单实例

18. 第五章:建议51:用mixin模式让程序更加灵活

Minxin也是一种多重继承的实现方式。ruby的多重继承就是mixin,它规定一个类只能有一个普通父类,但是可以有多个minin的父类。mixin类有几个特点:第一不能实例化,第二不能单独使用。简单的说,minxin类只实现了普通类的功能,不实现普通类的状态(改变)。

1
2
3
4
5
6
7
8
9
10
11
12
13
14
15
16
17
18
19
20
21
22
23
24
25
26
27
28
29
30
class IPerson(object):
def __init__(self, age):
self.age = 10
# 一个mixin类,实现跑的功能
# python不支持mixin语法,只要mixin类不实现自己特殊的初始化函数即可
class Runable(object):
def run(self):
print 'running'
class Crawl(object):
def crawl(self):
print 'crawl'
class Adult(IPerson, Runable, Crawl):
pass
class Baby(IPerson, Crawl)
pass
adult = Adult(100)
adult.run()
>>> running
adult.crawl()
>>> crawl
baby = Baby(1)
baby.crawl()
>>> crawl

另外,简单的在初始化时传入行为是在python中更加好的办法(而不是动态修改基类),这叫做策略模式。

1
2
3
4
5
6
7
8
9
10
11
12
13
14
15
16
17
18
19
20
21
22
23
24
25
26
import types
def run(self):
print 'run...'
def crawl(self):
print 'crawl..'
class Person(self):
def __init__(self, age, actions=None):
self.age = age
actions = actions or {}
for name, action in actions:
# 使用types.MethodType将func的类型转变为instancemethod,不转也行
setattr(self, name, types.MethodType(action, self))
adult = Person(25, {'run': run, 'crawl': crawl})
adult.run()
>>> run...
adult.crawl()
>>> crawl...
baby = Person(1, {'crawl': crawl})
baby.crawl()
>>> crawl...

19. 第五章:建议56:理解名字查找机制

其中嵌套作用域的代码缺少outer部分。

1
2
3
4
5
6
7
8
9
10
11
12
13
14
15
16
def outer():
var = 'a'
def inner():
global var
var = 'b'
print 'inside inner var is', var
inner()
print 'outside inner var is', var
outer()
>>> inside inner, var is b
>>> outside outer, var is a
var
>>> b

20. 第六章:建议60:区别__getattr__和__getattribute__

a. __getattr__是一般的属性方法查找函数,当属性方法不在instance.__dict__或者调用方法返回AttributeError时被调用;
b. __getattribute__会接管一切属性方法包括特殊方法的查找,即使当前实例的属性方法存在。

21. 第六章:建议65:熟悉python的迭代器协议

a. 产生器是产生器,迭代器是迭代器。python没有强制类型,一般都过协议(接口)定义行为。产生器只不过是支持迭代器的协议有相应的接口,但不能说产生器是迭代器。
b. groupby的代码示例有误,输出的是一个列表的列表。

1
2
3
4
5
[list(g) for k, g in groupby('AAAABBBCCD')] --> AAAA BBB CCC DD
==>
[list(g) for k, g in groupby('AAAABBBCCD')]
>>> [['A', 'A', 'A', 'A'], ['B', 'B', 'B'], ['C', 'C'], ['D']]

21. 第六章:建议67:基于生成器的协程及greenlet

”其中的适时是多久,基本只能静态地使用经验值“。生产-消费模型中一般会使用信号量来解决等待和唤醒问题,不用人为的调用sleep设置睡眠时间,所以也不用”静态地使用经验值“。

22. 第六章:建议68:理解GIL的局限性。

a. “默认情况下每个100个时钟“。python的100个执行指令,但是并不是严格限制,因为有些指令会有跳转等情况导致不能严格的100个指令就让出线程。确切的说是进行一次线程switch,python2.7不保证当前的线程一定会让出,全部由操作系统内核本身决定。

b. GIL存在的主要原因就是GIL会使解释器简洁而且高效。不然的话,需要将全局锁细化到每个需要同步的代码和结构中,大量锁的处理使解释器很难编写,大量锁的竞争等反而使解释器性能下降。简单来说,GIL是粗粒度的锁,比细粒度的锁的优势更大(一种折中方案)。

23. 第八章:建议87:利用set的优势

“1)向list和set中添加元素,…list的耗时约是set的89倍“。这个结论有误,原因在于测试代码中增加了查找操作”x in tmp“,list中的查找是O(n),set是O(1),而不是添加元素的耗时差距。实际上,由于set是哈希表需要计算添加元素的哈希值并且需要调用冲撞函数,一般比list的直接添加元素需要更多额外操作的时间。

1
2
3
4
5
6
7
s = list();
%timeit for i in xrange(1000): s.append(i)
10000 loops, best of 3: 155 µs per loop
s = set();
%timeit for i in xrange(1000): s.add(i)
10000 loops, best of 3: 158 µs per loop
123
FanChao

FanChao

Enjoin it!

40 日志
19 分类
1 标签
RSS
© 2018 FanChao
由 Hexo 强力驱动
主题 - NexT.Mist